How to Install Lyon Chrome Automatic Soap Dispenser | FS10048
Easy step by step Installation Instructions for Commercial Sensor Automatic Soap Dispenser
- Before you begin, please read the installation instructions below. Observe all local building and safety codes.
- Unpack and inspect the product for any shipping damages. If you find damages, do not install.
- Please note all showers must be installed by a professional and certified plumber otherwise warranty might be voided.
|
sensor
|

|
Automatic Soap Dispenser Installation Instructions
|
Step 1:
|
sensor
|
Step 2:
|
|
 |
|

|
|
|
|
Max Deck Thickness - 1.5"
|
|
|
Step 3:
|
|
Step 4:
|
|
|
|
|
|
|
|
|
|
|
Step 5:
|
|
Step 6:
|
|
|
|
|
|
|
|
|
|
|
Step 7:
|
|
Step 8:
|
|
|
|
|
|
|
Step 9:
|
|
|
|
 |
|
|
|
|
|
|
|
|
|
|
|
|
|
Features:
More Hygienic
The proximity sensor removes the need to touch the spout, reducing the spread of germs and reducing the chance of cross-infection.
Battery Override
Your infrared soap dispenser is supplied with a backup battery pack. In the event of a power failure, the product will automatically switch to battery-operated mode to ensure the spout continues to function.
Low Battery Warning
When the batteries run low and the power falls below 3.9V the sensor light will flicker to indicate the batteries are running low and need replacing.
When the batteries are exhausted the sensor light will not light up.
Electrical Connections
Regulations: The electrical installation must be carried out in accordance with the national electrical regulations and installed by a qualified person.
Safety: In the interests of electrical safety a 30 mA residual current device (R.C.D not supplied) should be installed in the supply circuit. This may be part of a consumer unit or a separate unit.
Before starting work on the electrical supply ensure the power supply is isolated.
DO NOT allow the supply cord to contact hot surfaces. The cord should be safely routed and secured by cable clips.
Connections: The power supply must be permanently connected to the fixed wiring of the mains supply using the factory fitted supply cord, via a switched fused spur off the ring main.
The wires in the mains lead are coloured in accordance with the following code:
Blue: Neutral
Brown: Live
As the colours of the wires in the mains lead of this appliance may not correspond with the coloured markings identifying the terminals in your connection unit proceed as follows;-
The wire which is coloured blue must be connected to the terminal which is marked with the letter ‘N’ or is coloured black.
The wire which is coloured brown must be connected to the terminal which is marked with the letter ‘L’ or is coloured red.
Installation
1. Fit The Spout
Fit the spout to the sink/basin ensuring the dispensing cable and sensor cable are threaded through the hole in the sink/basin.
2. Secure Spout to Sink / Basin
Screw the metal back nut onto the thread of the spout upto the underside of the sink/basin.
Tighten backnut using a suitable spanner.
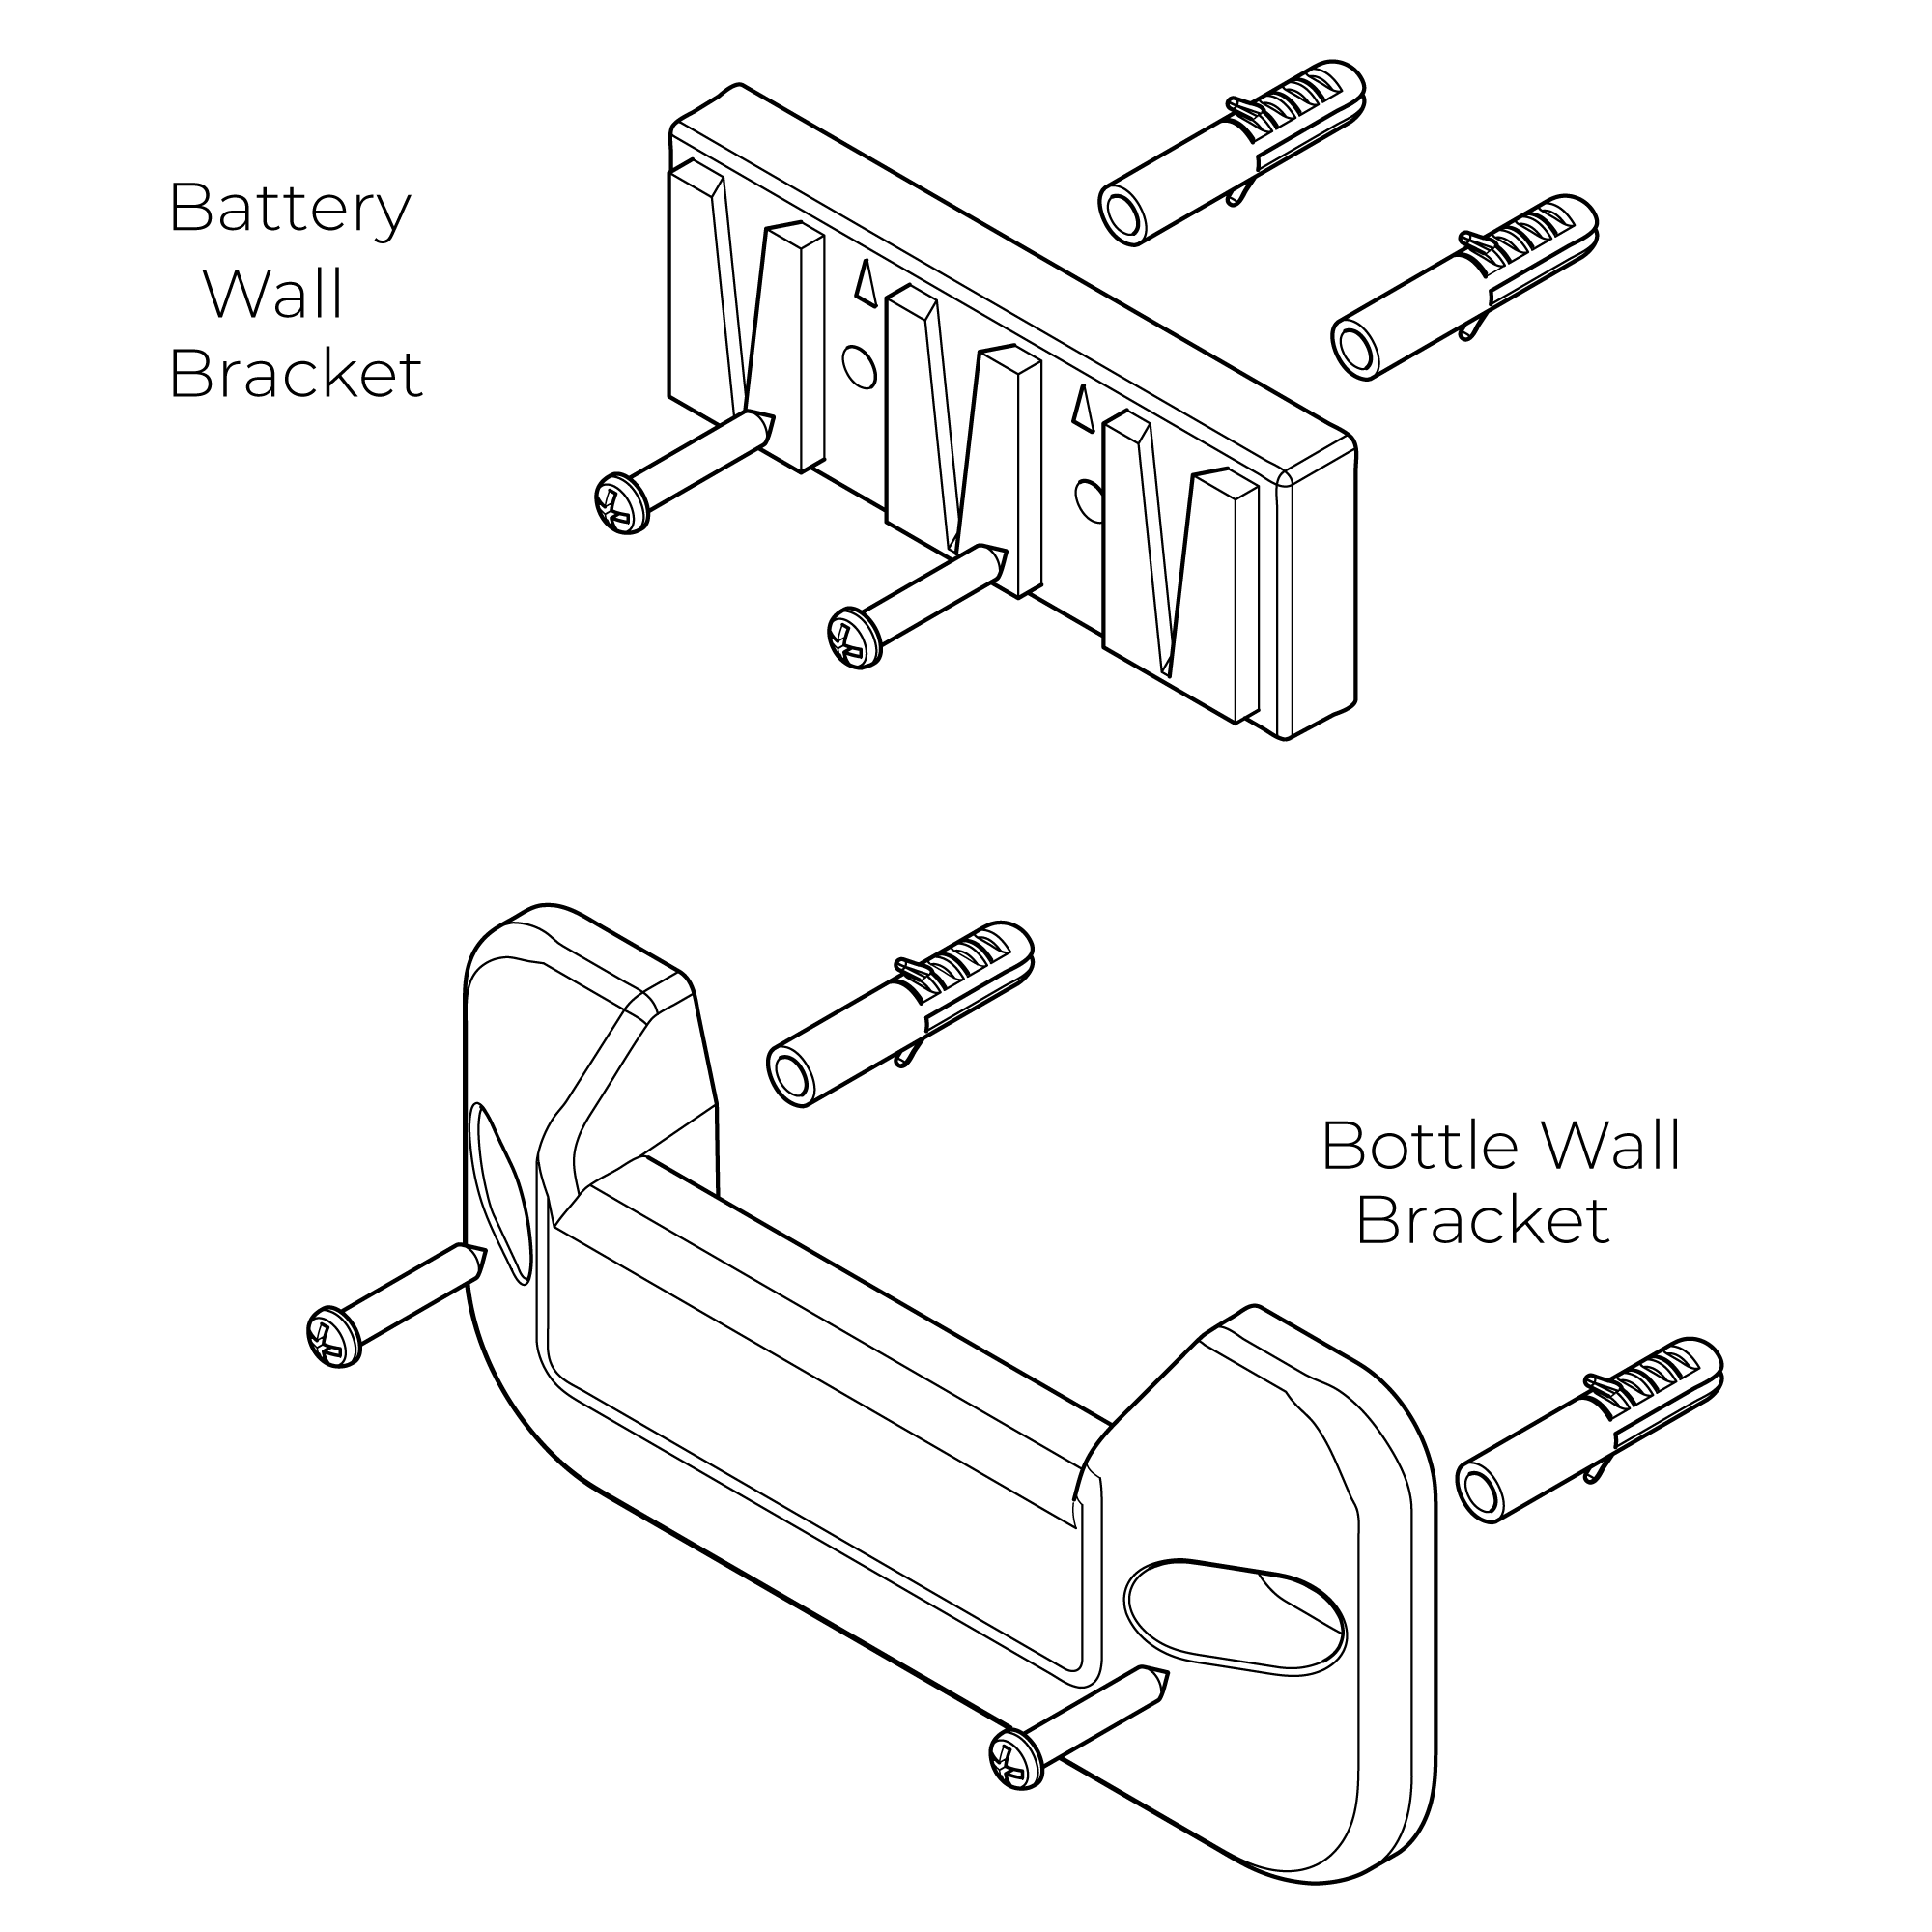
3. Fit Wall Brackets
Position the brackets onto the wall surface and mark the position of the fixing holes.
Remove the brackets and drill suitable holes for the wall plugs supplied.
Before drilling into walls, check that there are no hidden electrical wires, cables or water supply pipes. This can be checked with the aid of an electrical detector:
If power tools are used do not forget to:
- Wear eye protection
- Unplug equipment after use
Fit the wall plugs and position the brackets into position and secure using the screws provided.
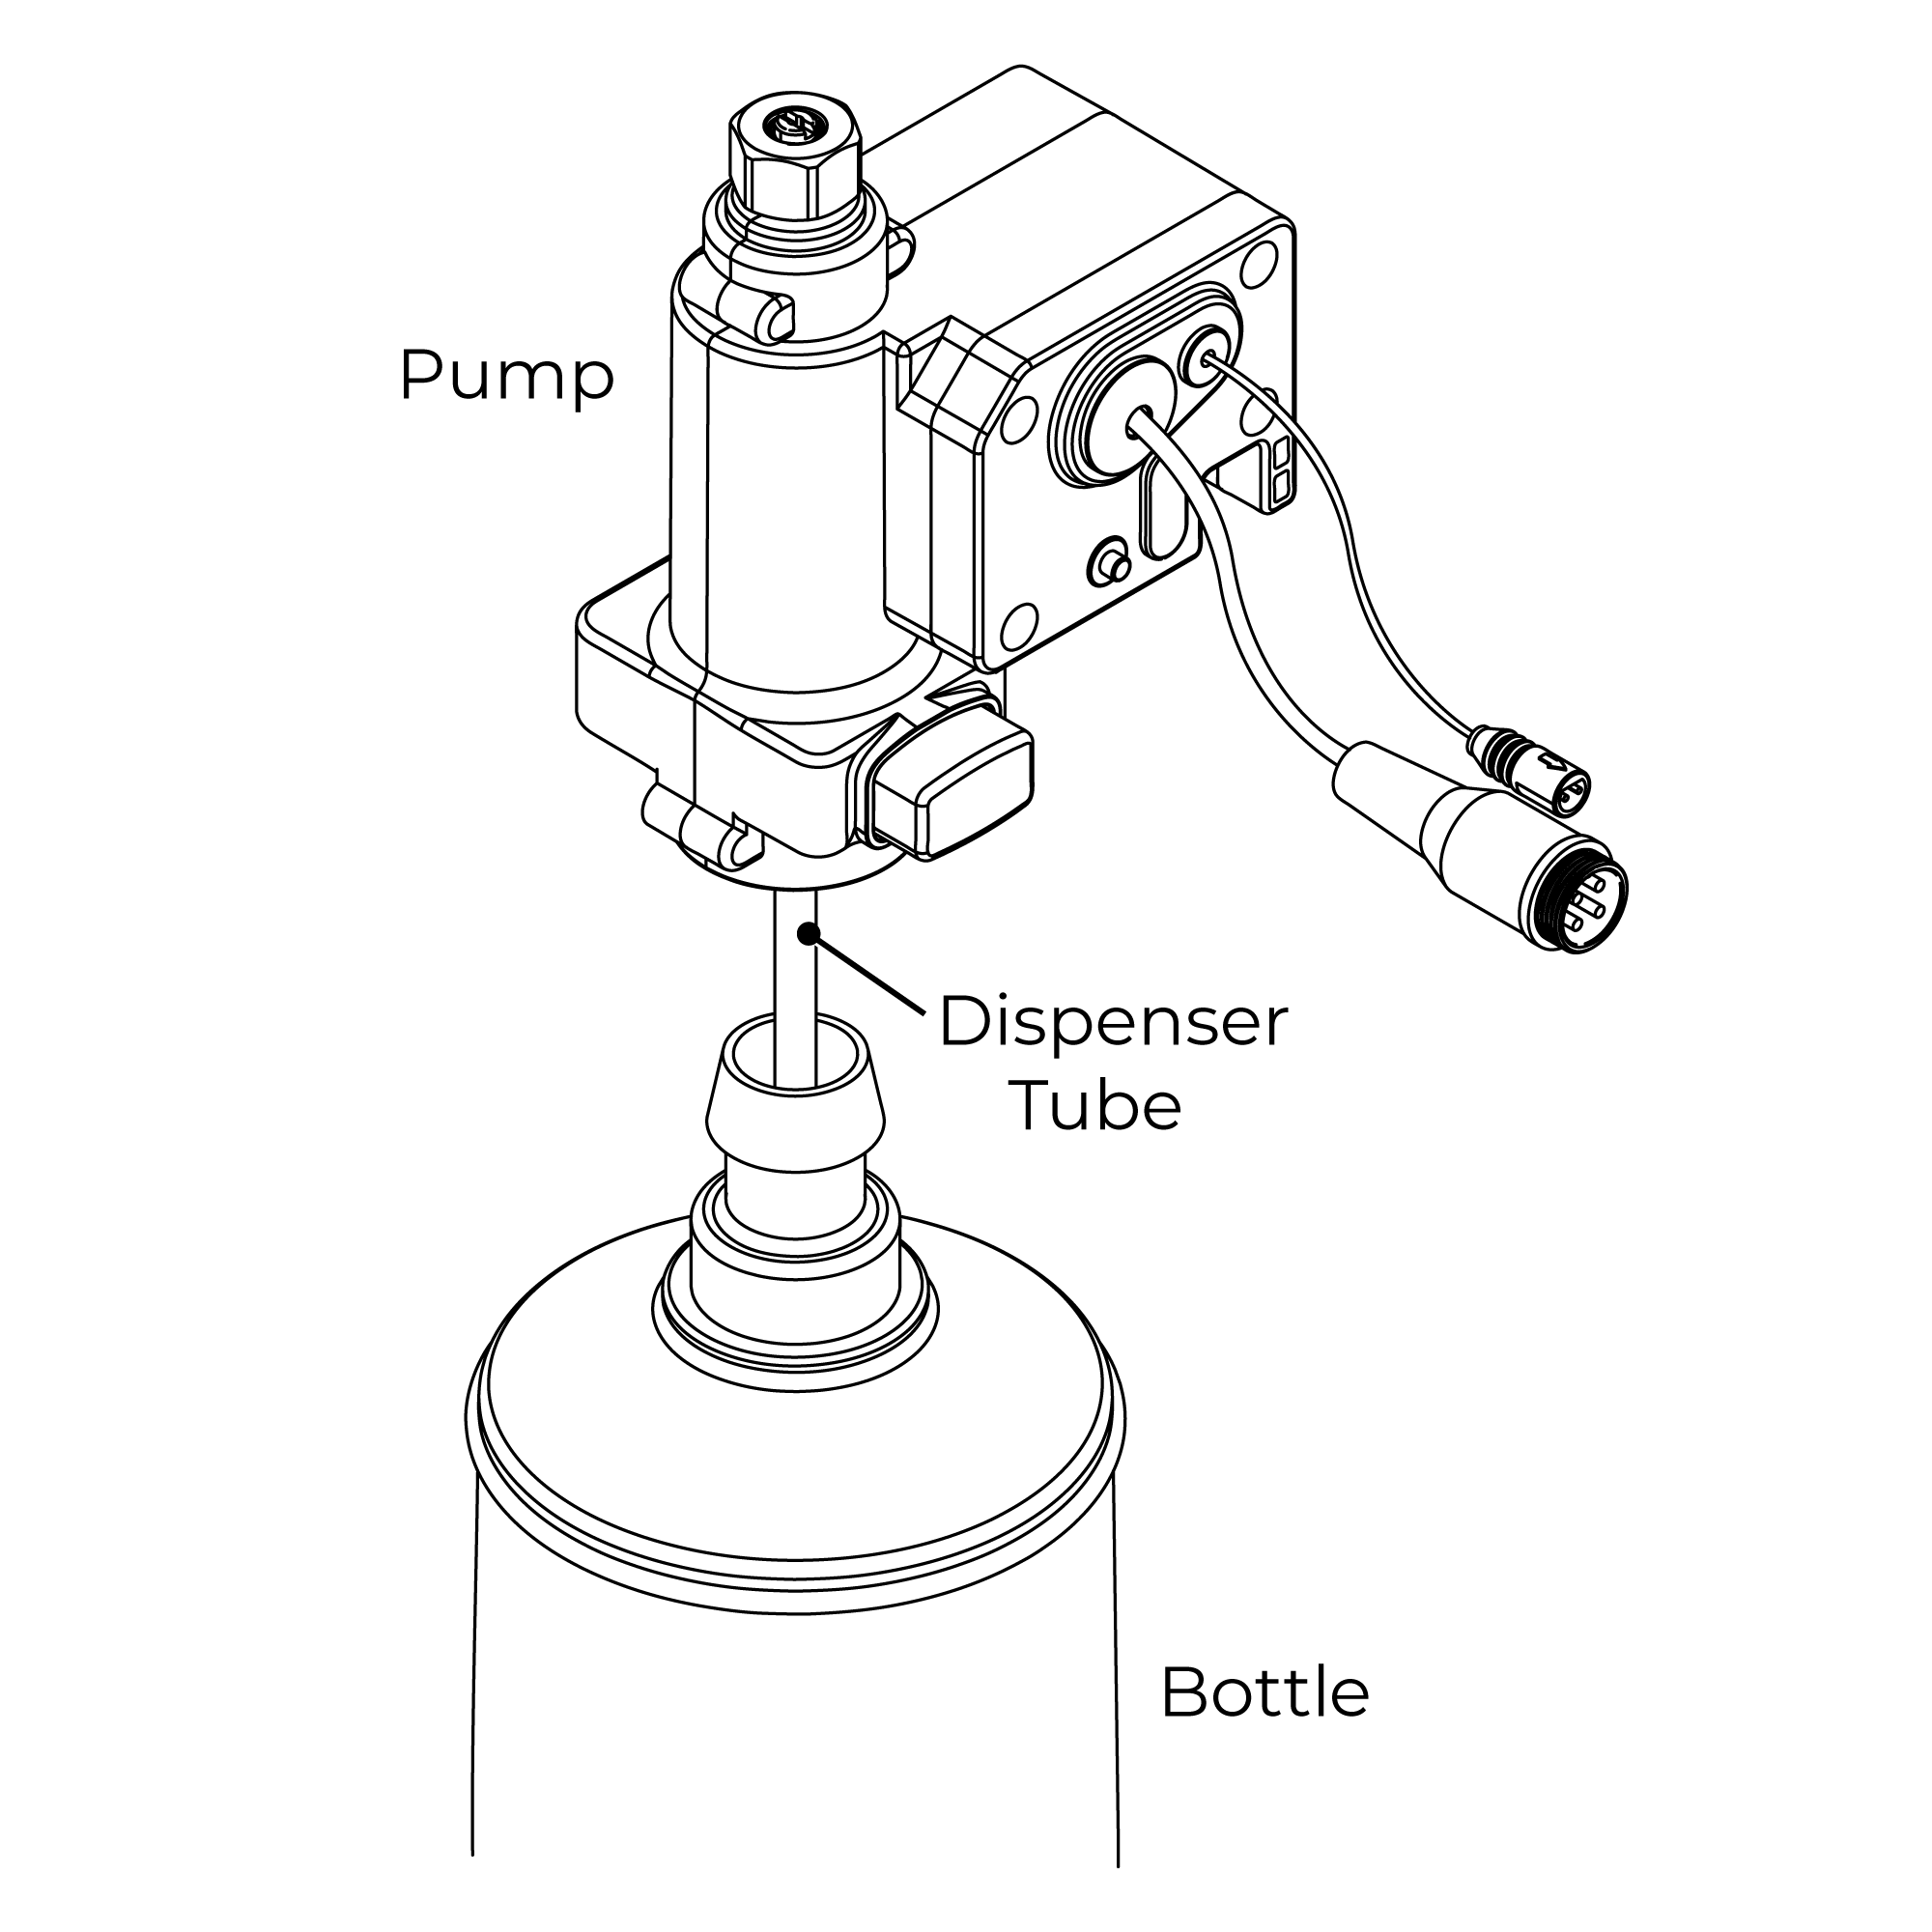
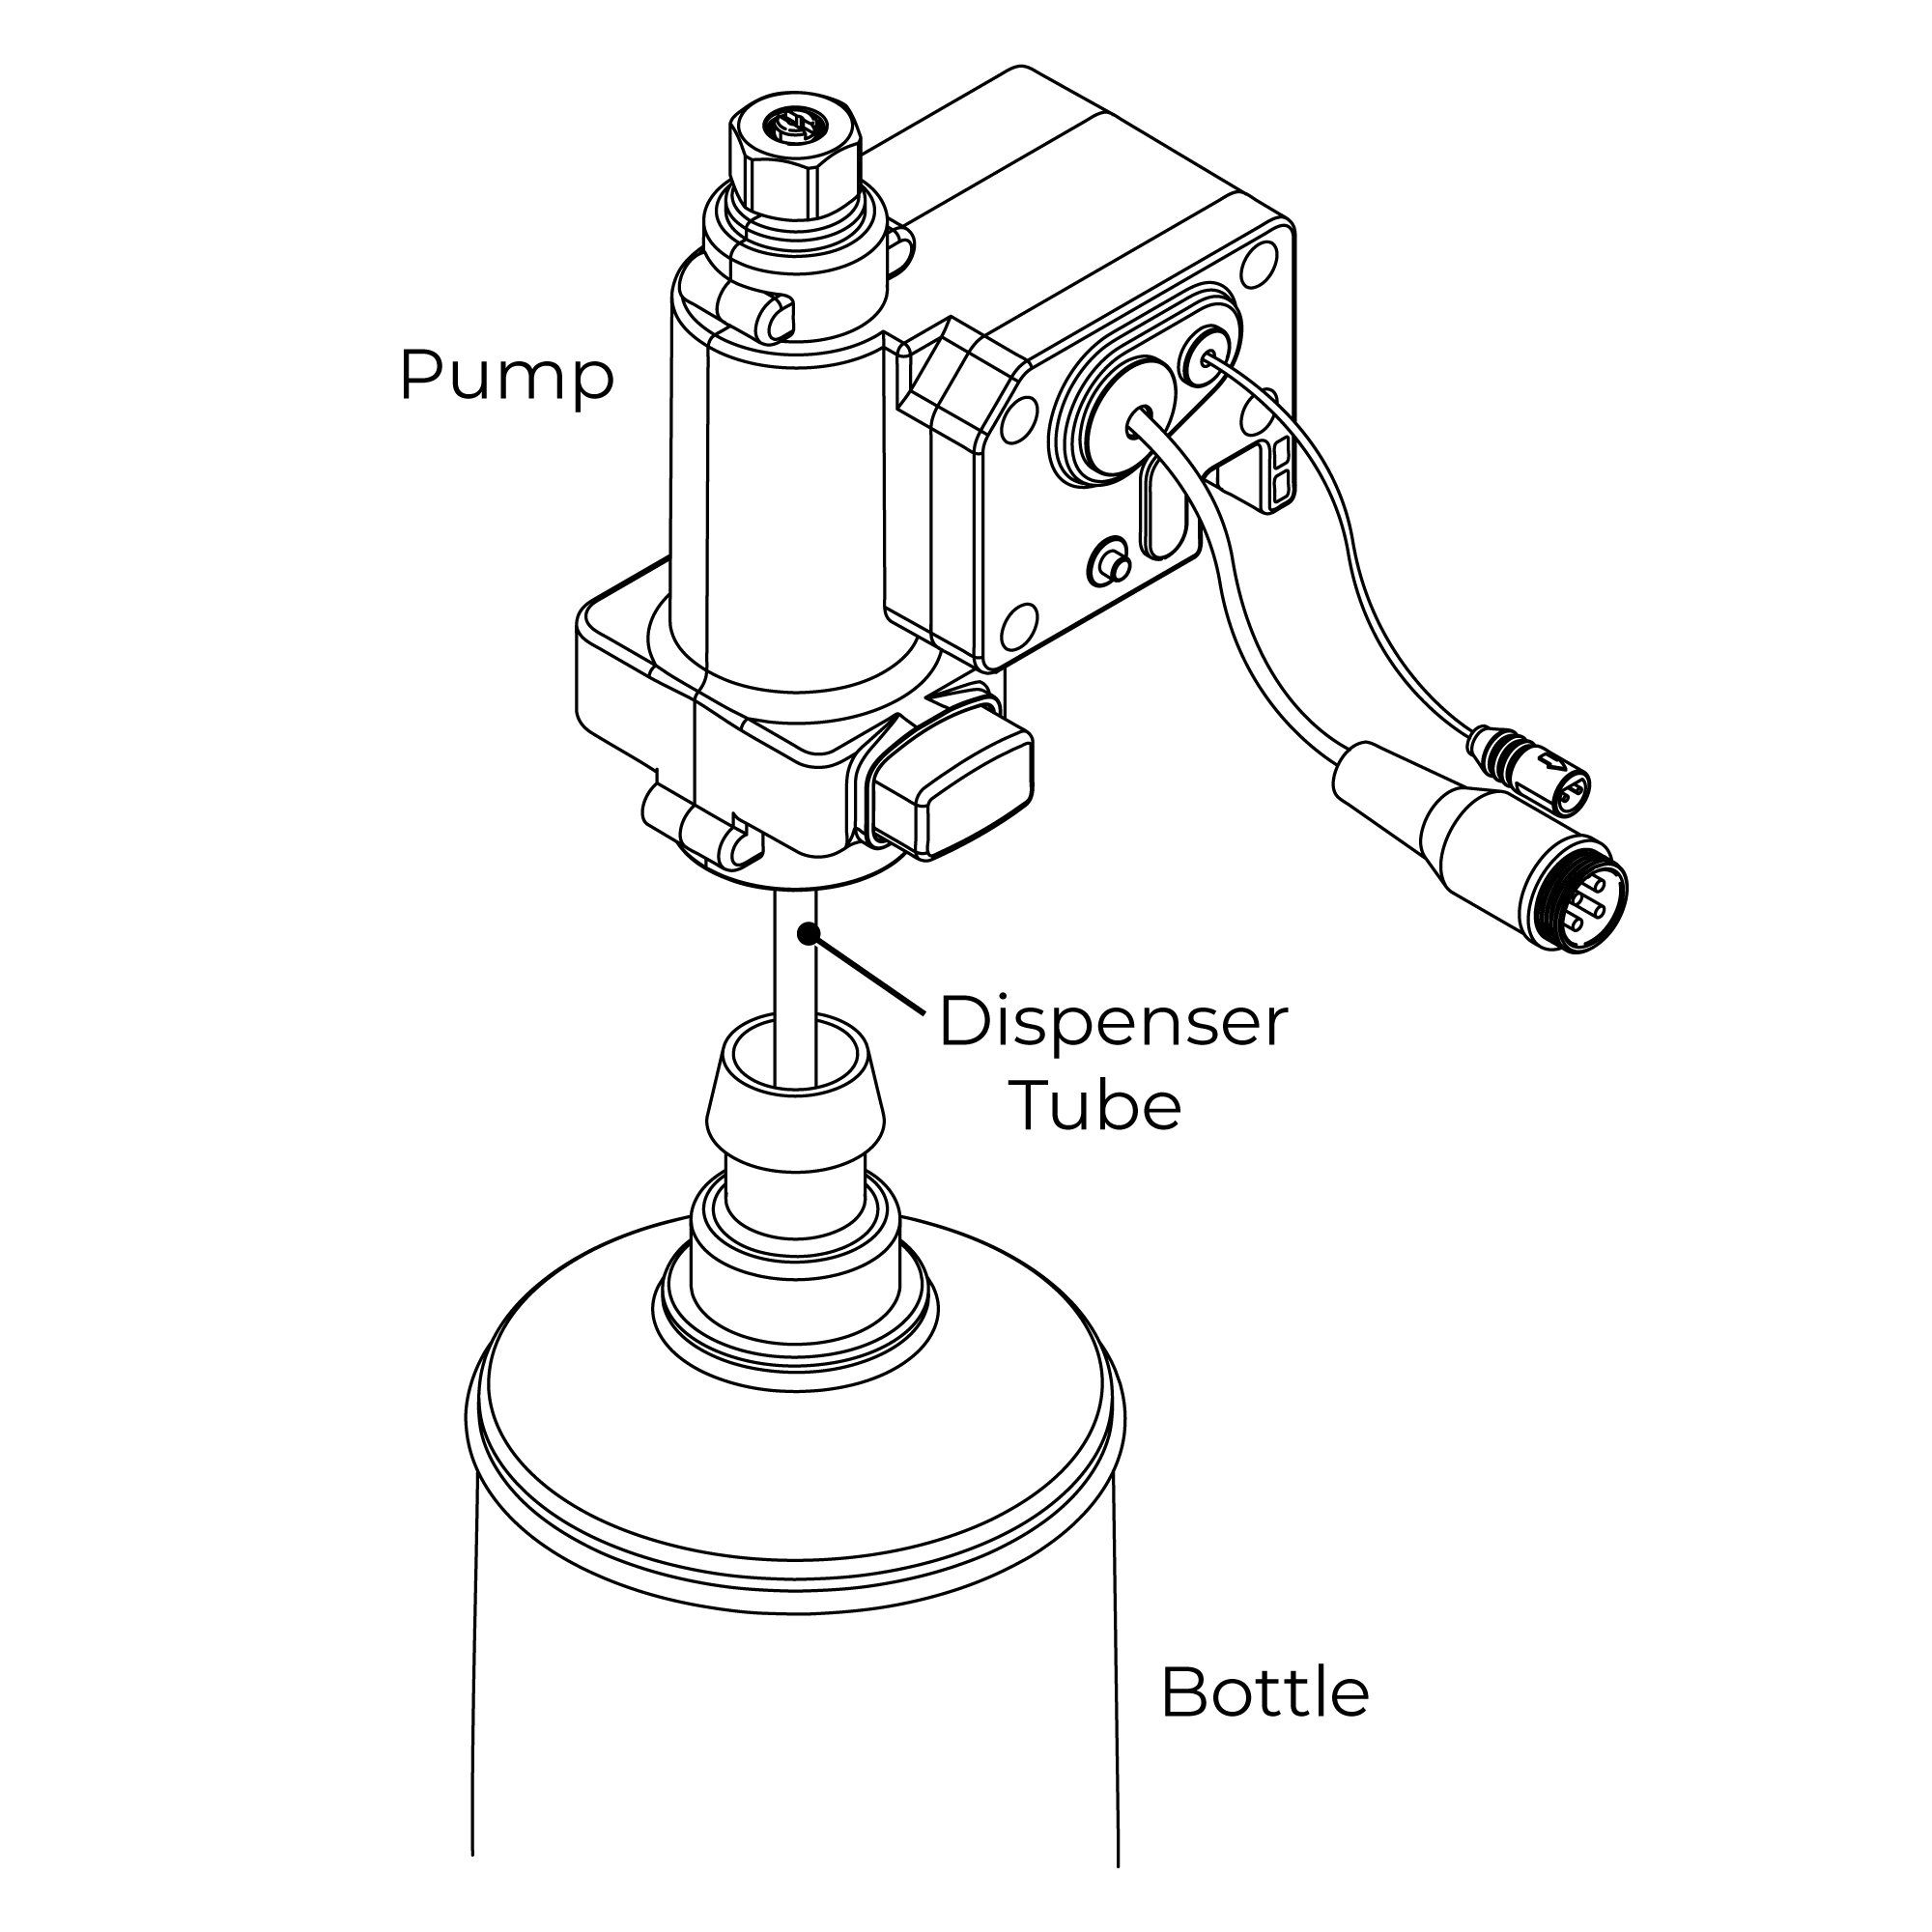
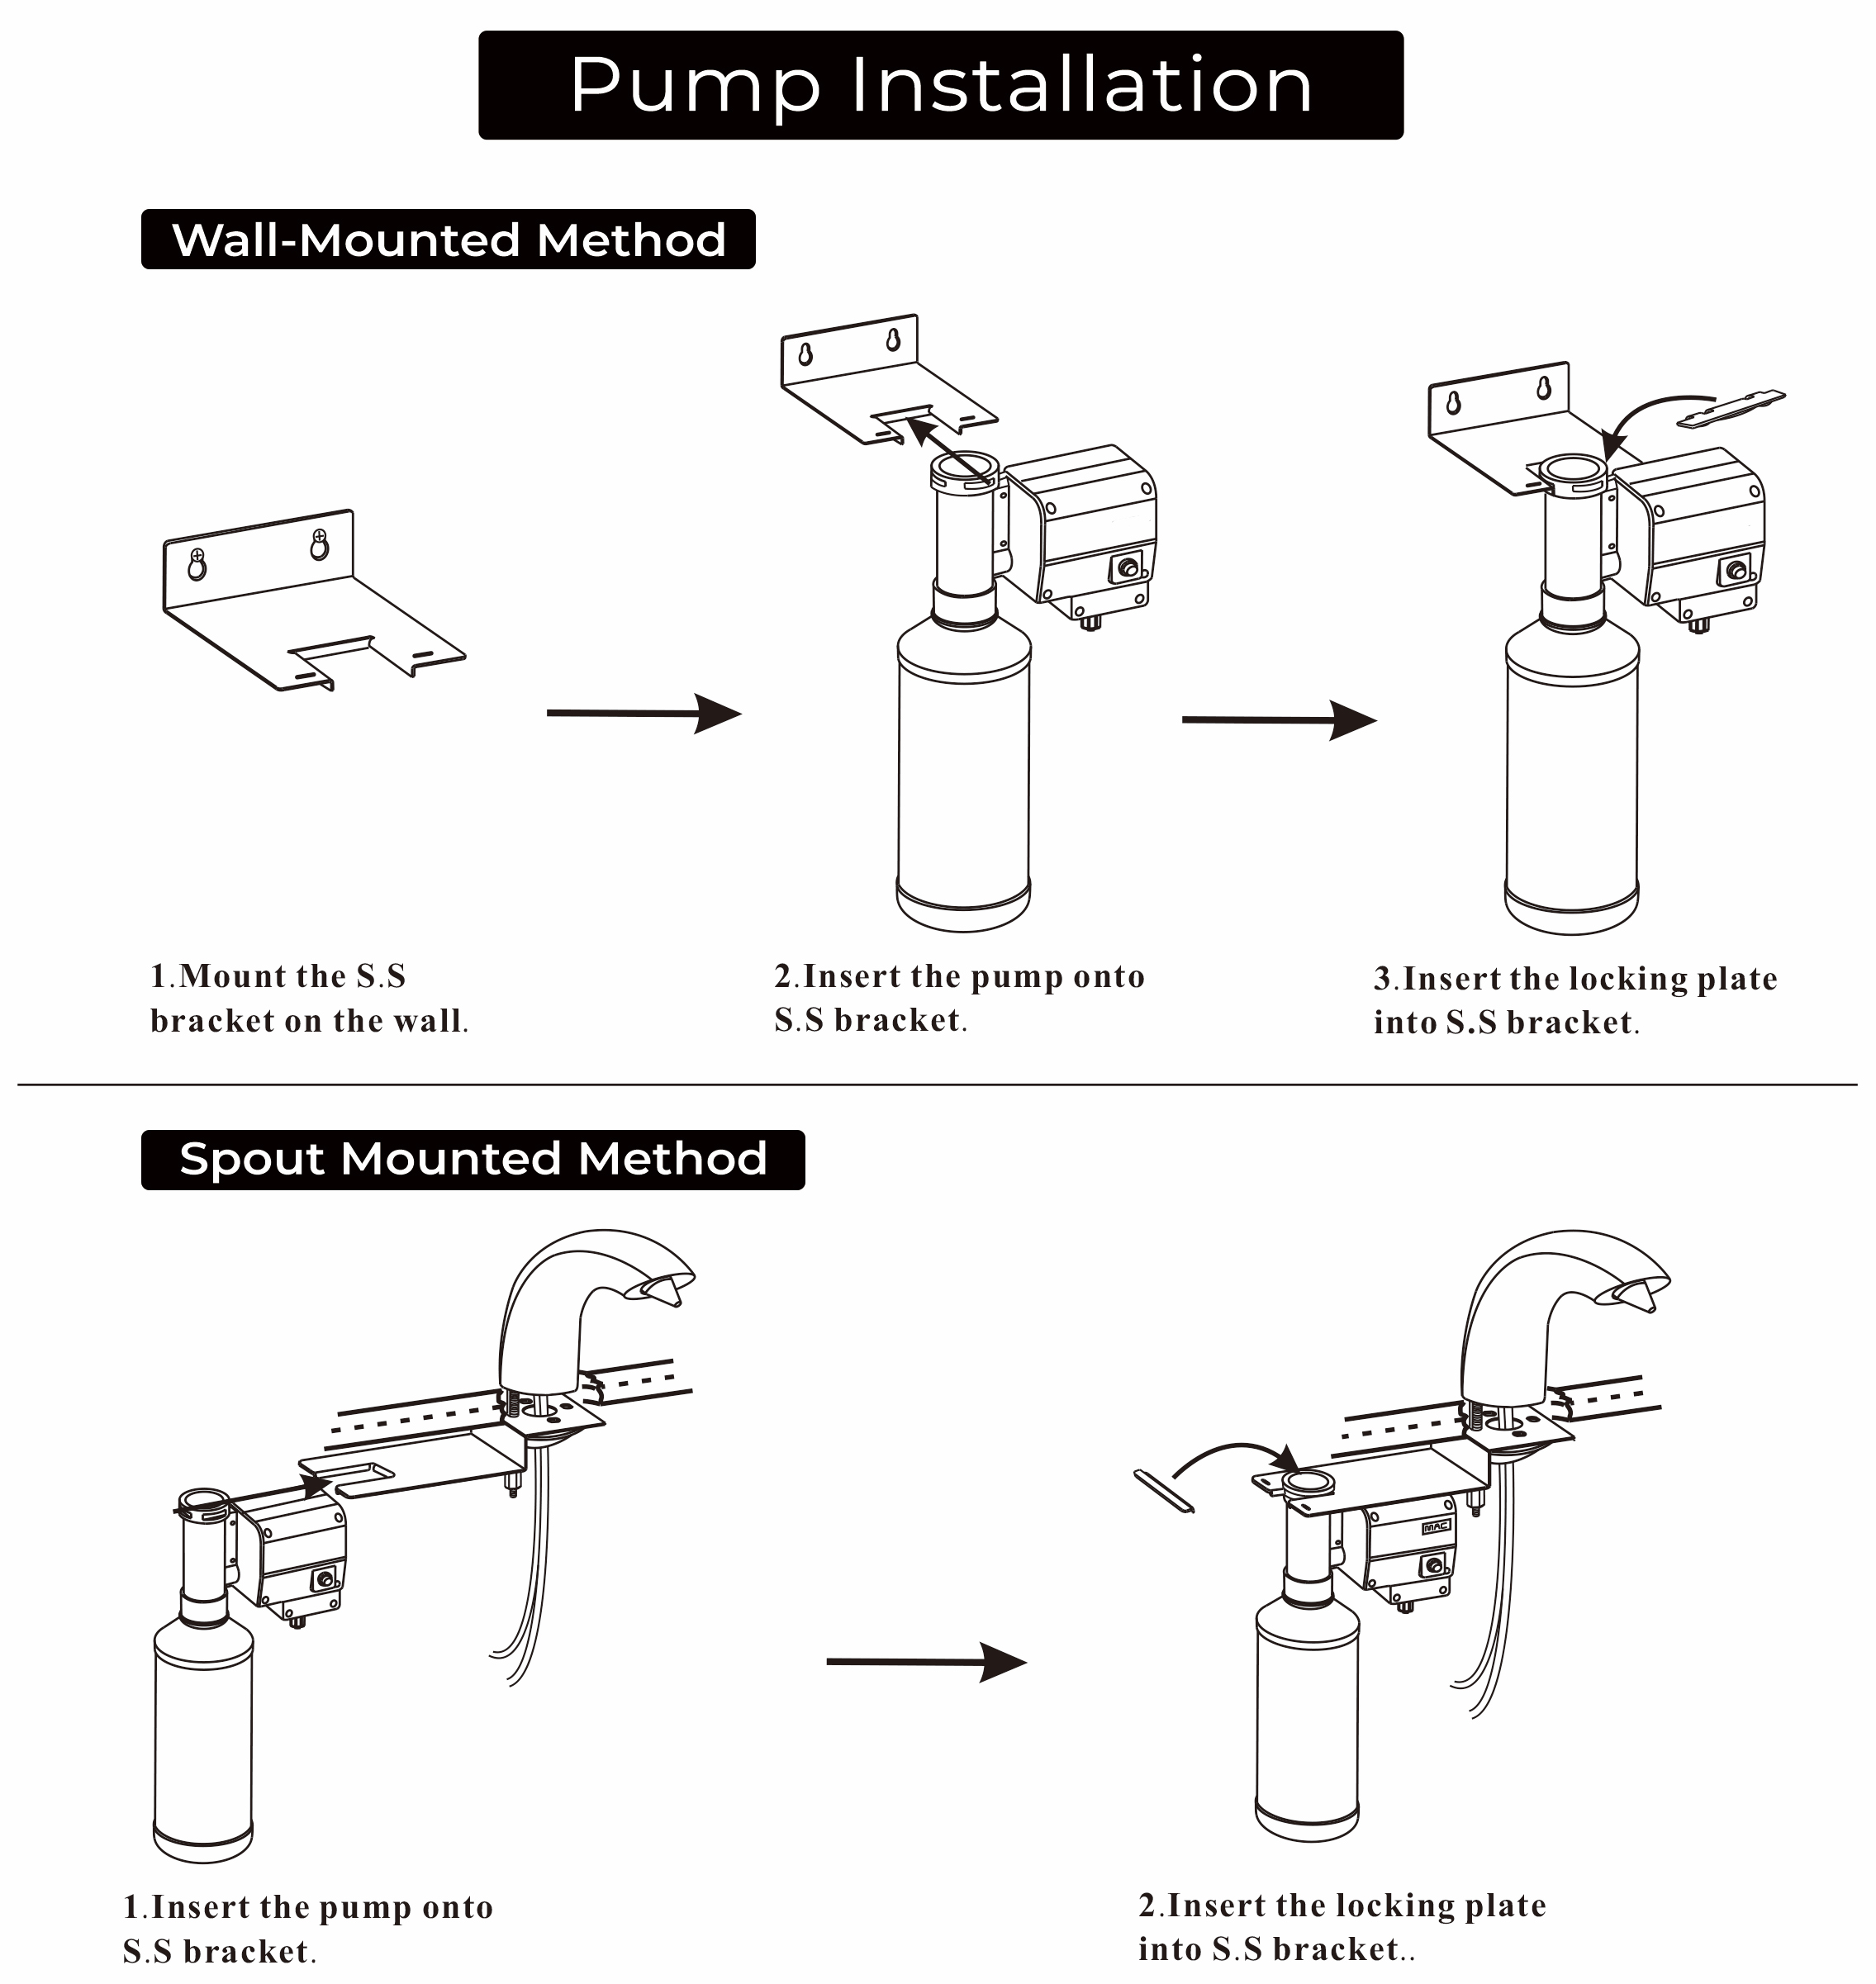
4. Attach Pump to Bottle
Ensure the dispenser tube is located inside the bottle and push the pump down firmly onto the bottle until a loud ‘click’ is heard.
To remove the pump from the bottle press the release button in on the side of the pump and pull the pump from the bottle.
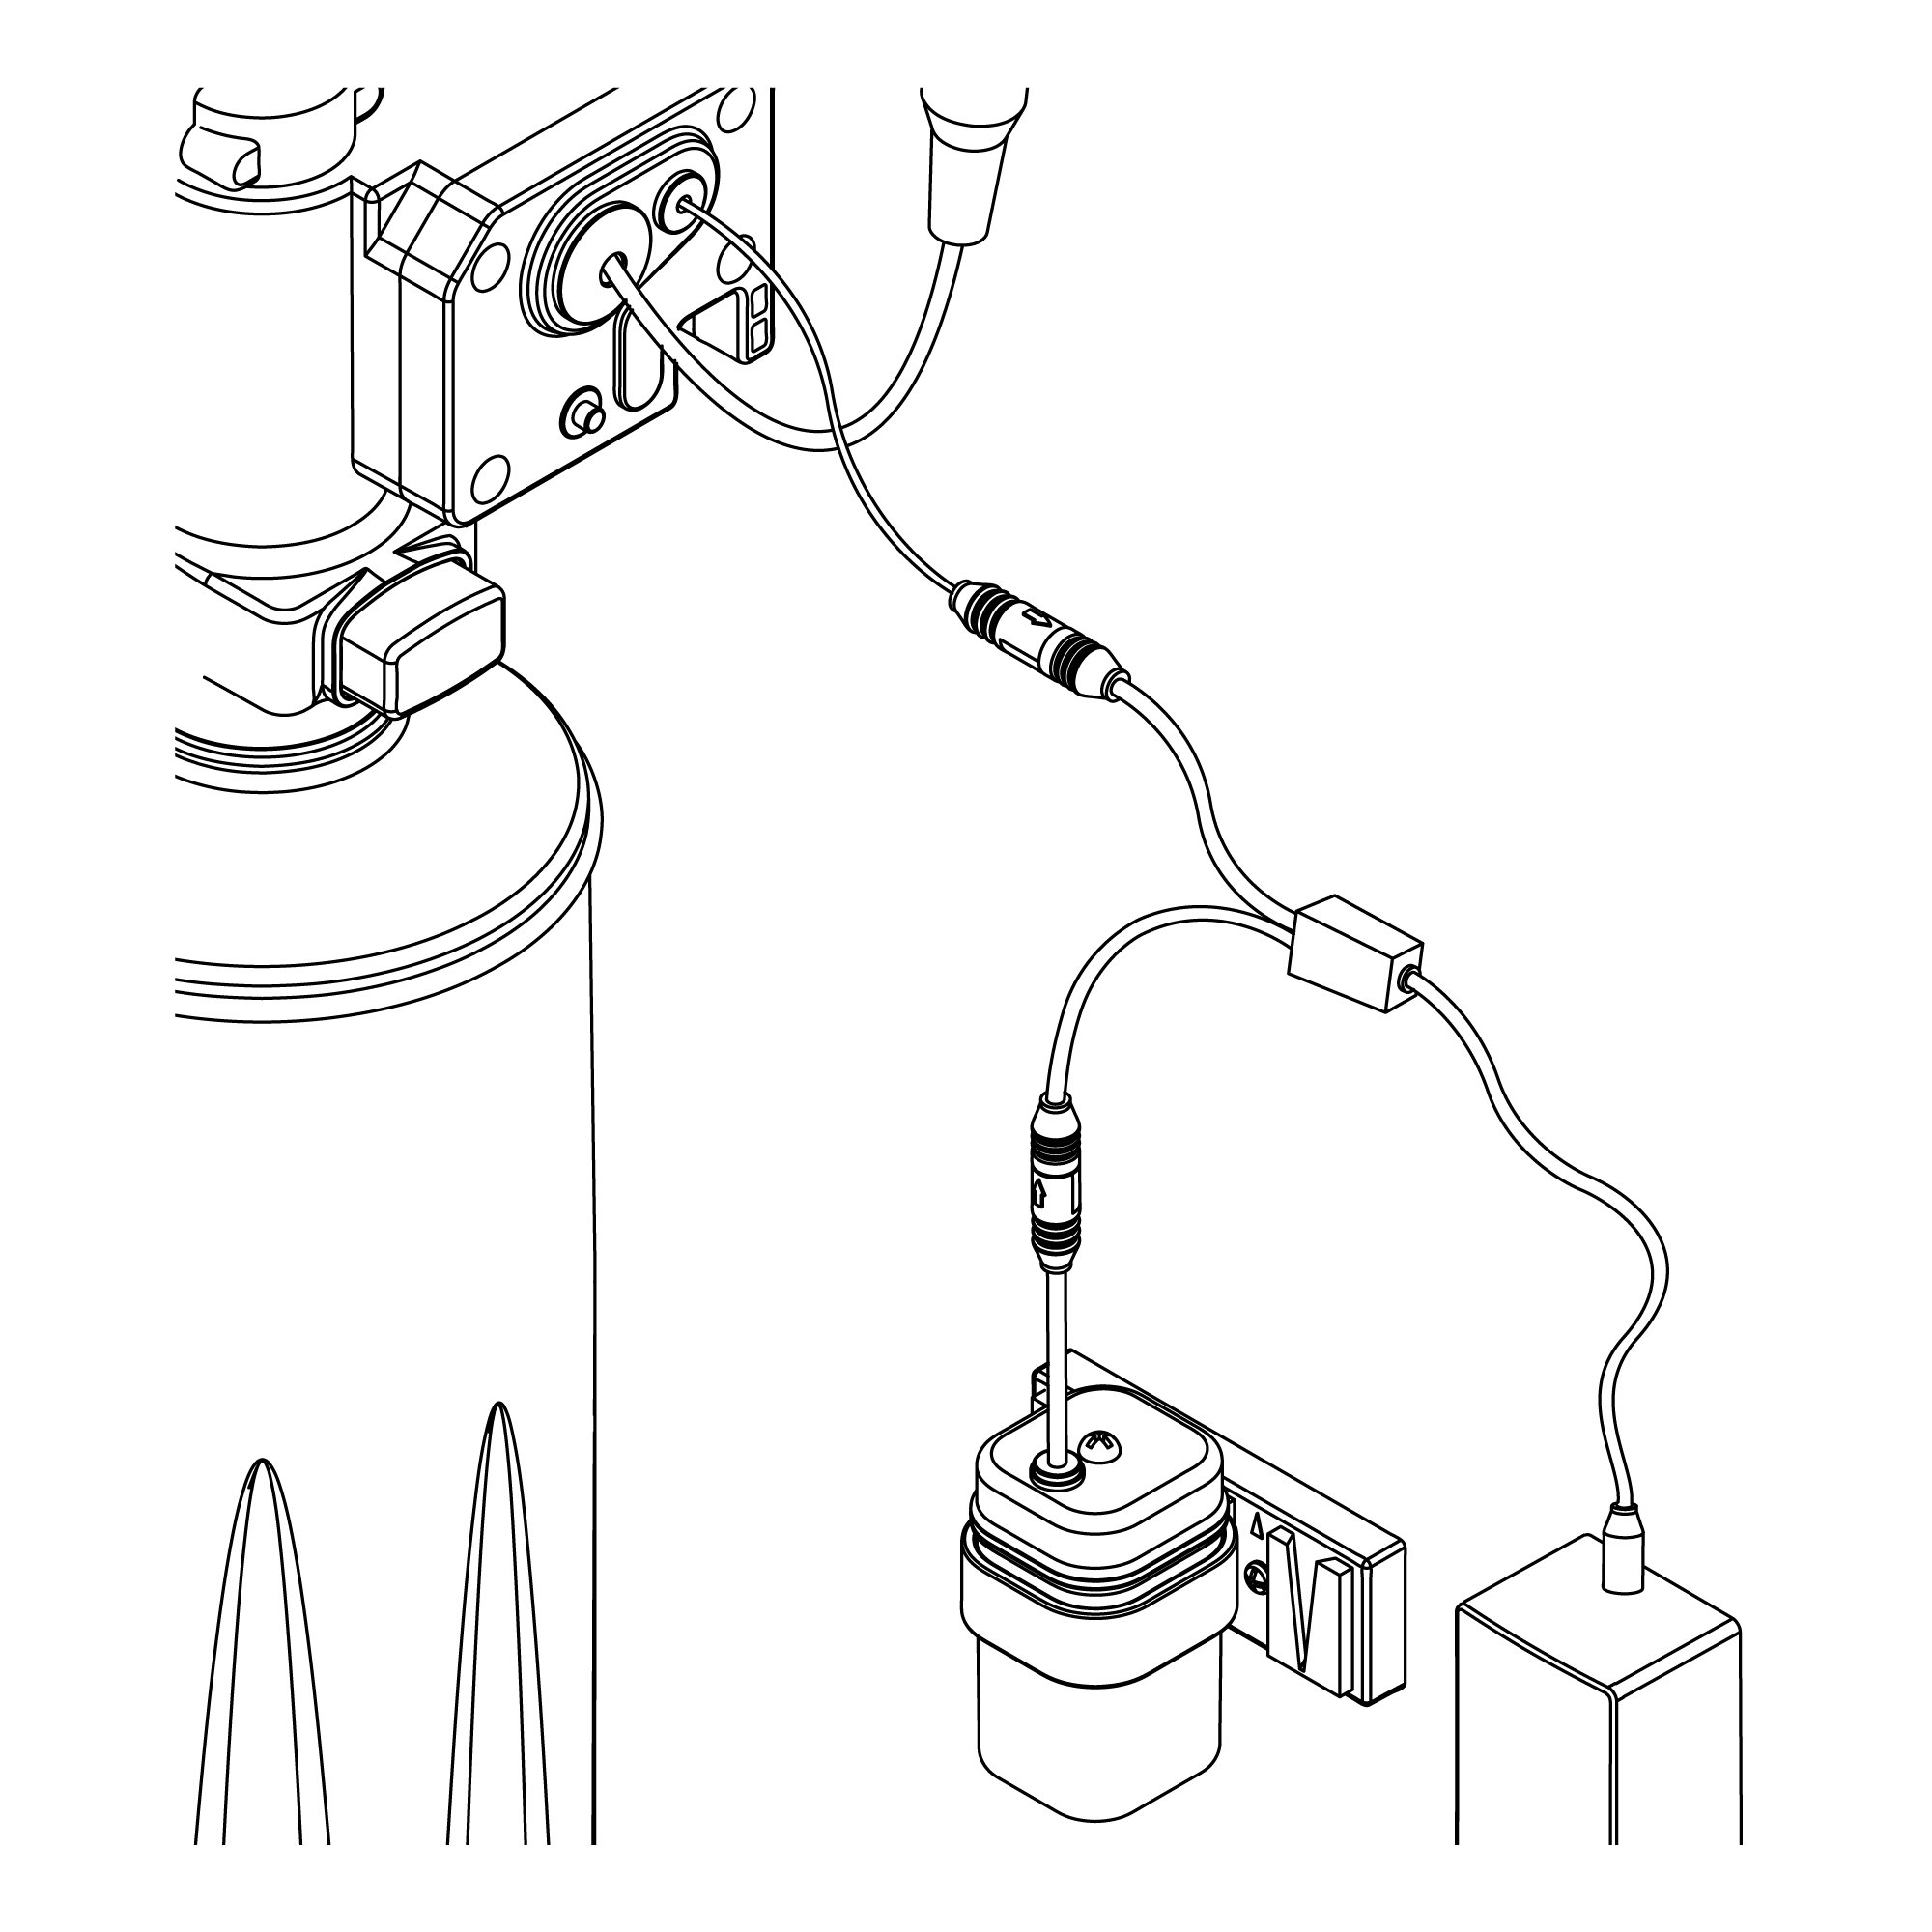
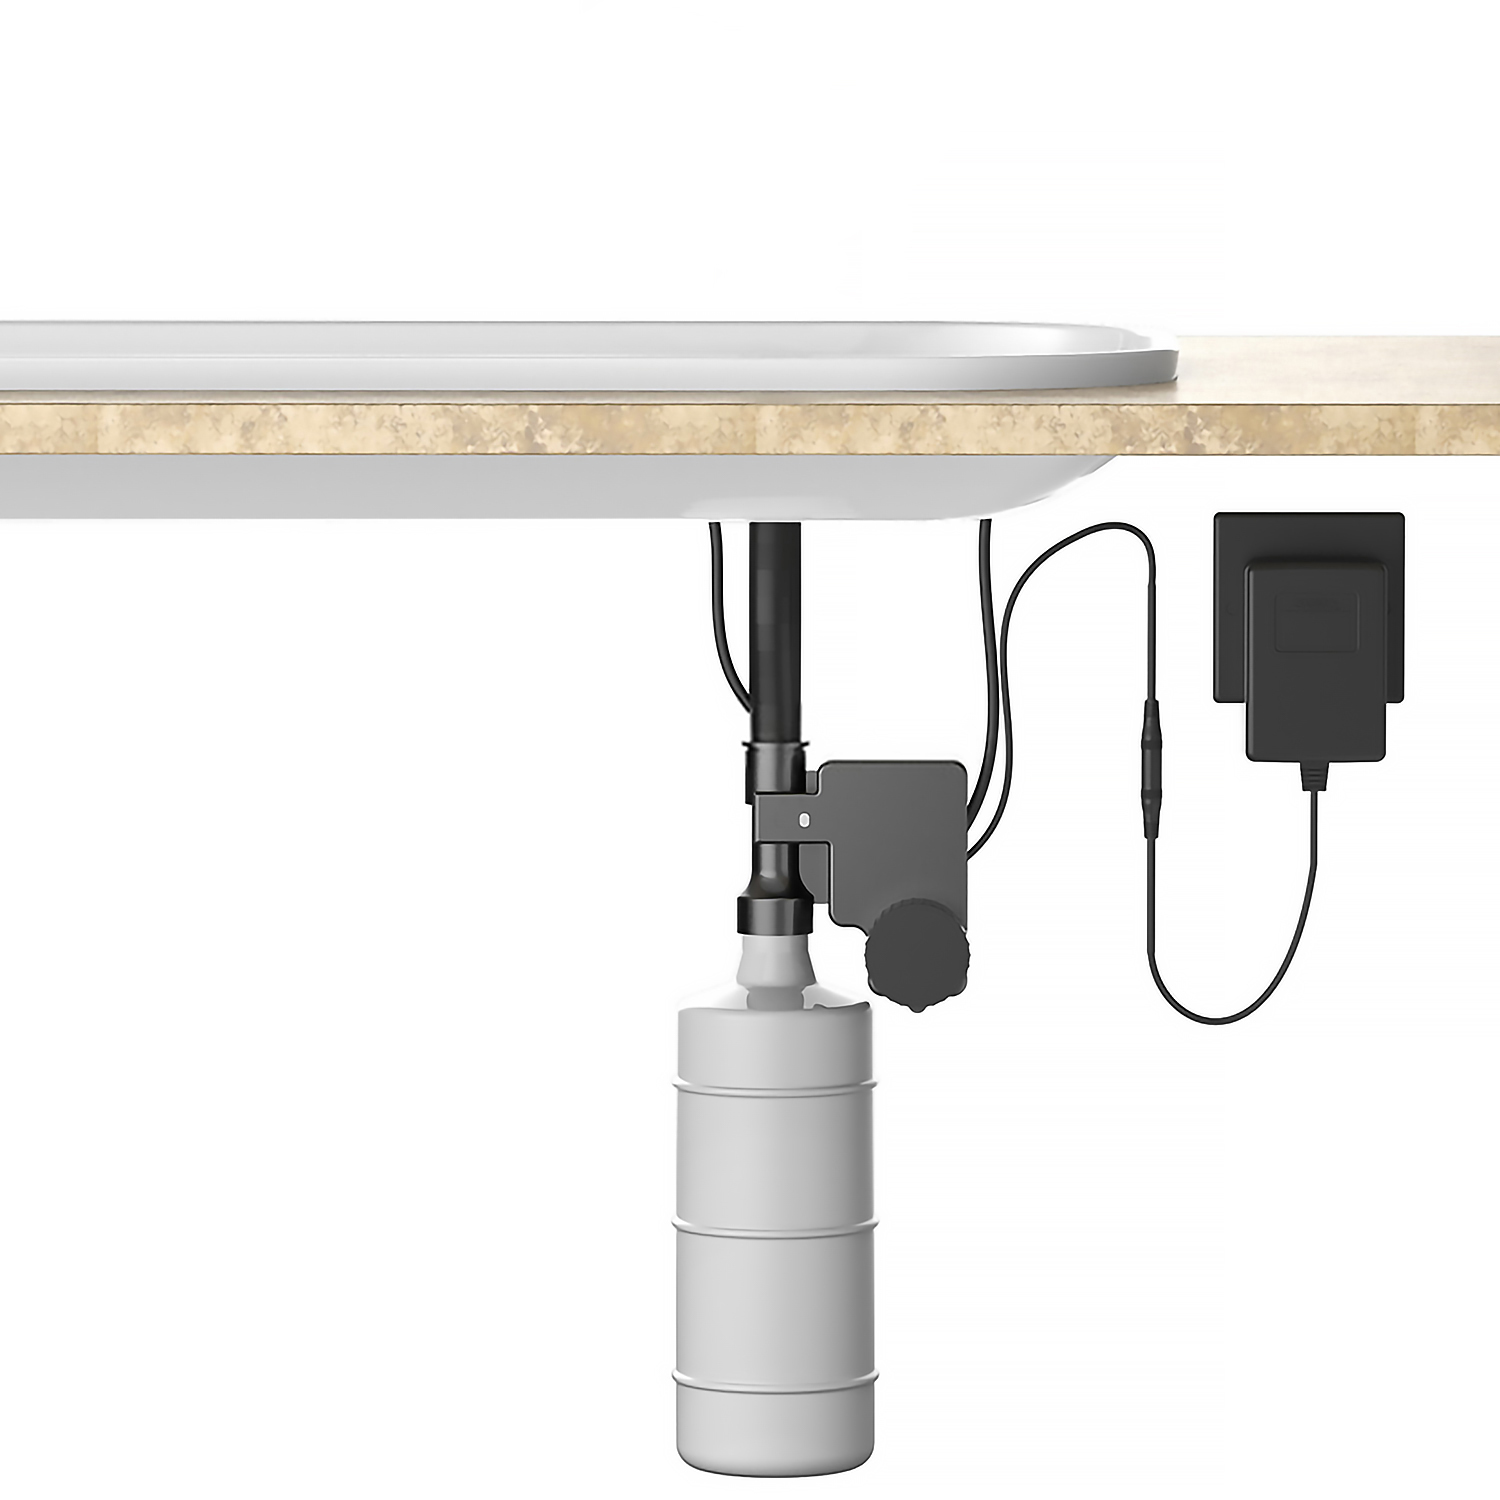
5. Connect Sensor Cable and Dispenser Cable
Connect the sensor cable from the spout to the sensor cable on the pump. Push the two connections together and tighten the connecting ring to ensure the two connections are locked together.
Connect the dispensing cable from the spout into the top connection on the pump.
Push the threaded connection of the dispensing cable into the connection on the pump and tighten the nut ensuring it is fully tightened.
A suitable spanner may be used to tighten the nut.
6. Place Pump into Bracket
The pump has a cut-out section which the wall bracket slots into.
7. Connect Power Supply Cable
Before starting any electrical work ensure the power supply is isolated.
Wire the electrical power cable into a switched fused spur off the ring main.
The blue wire should be wired to the neutral connection and the brown wire should be connected to the live connection.
Important: The power lead must be permanently connected to the fixed wiring of the mains supply using the factory supplied power cable.
Plug the power cable into the power cable on the pump.
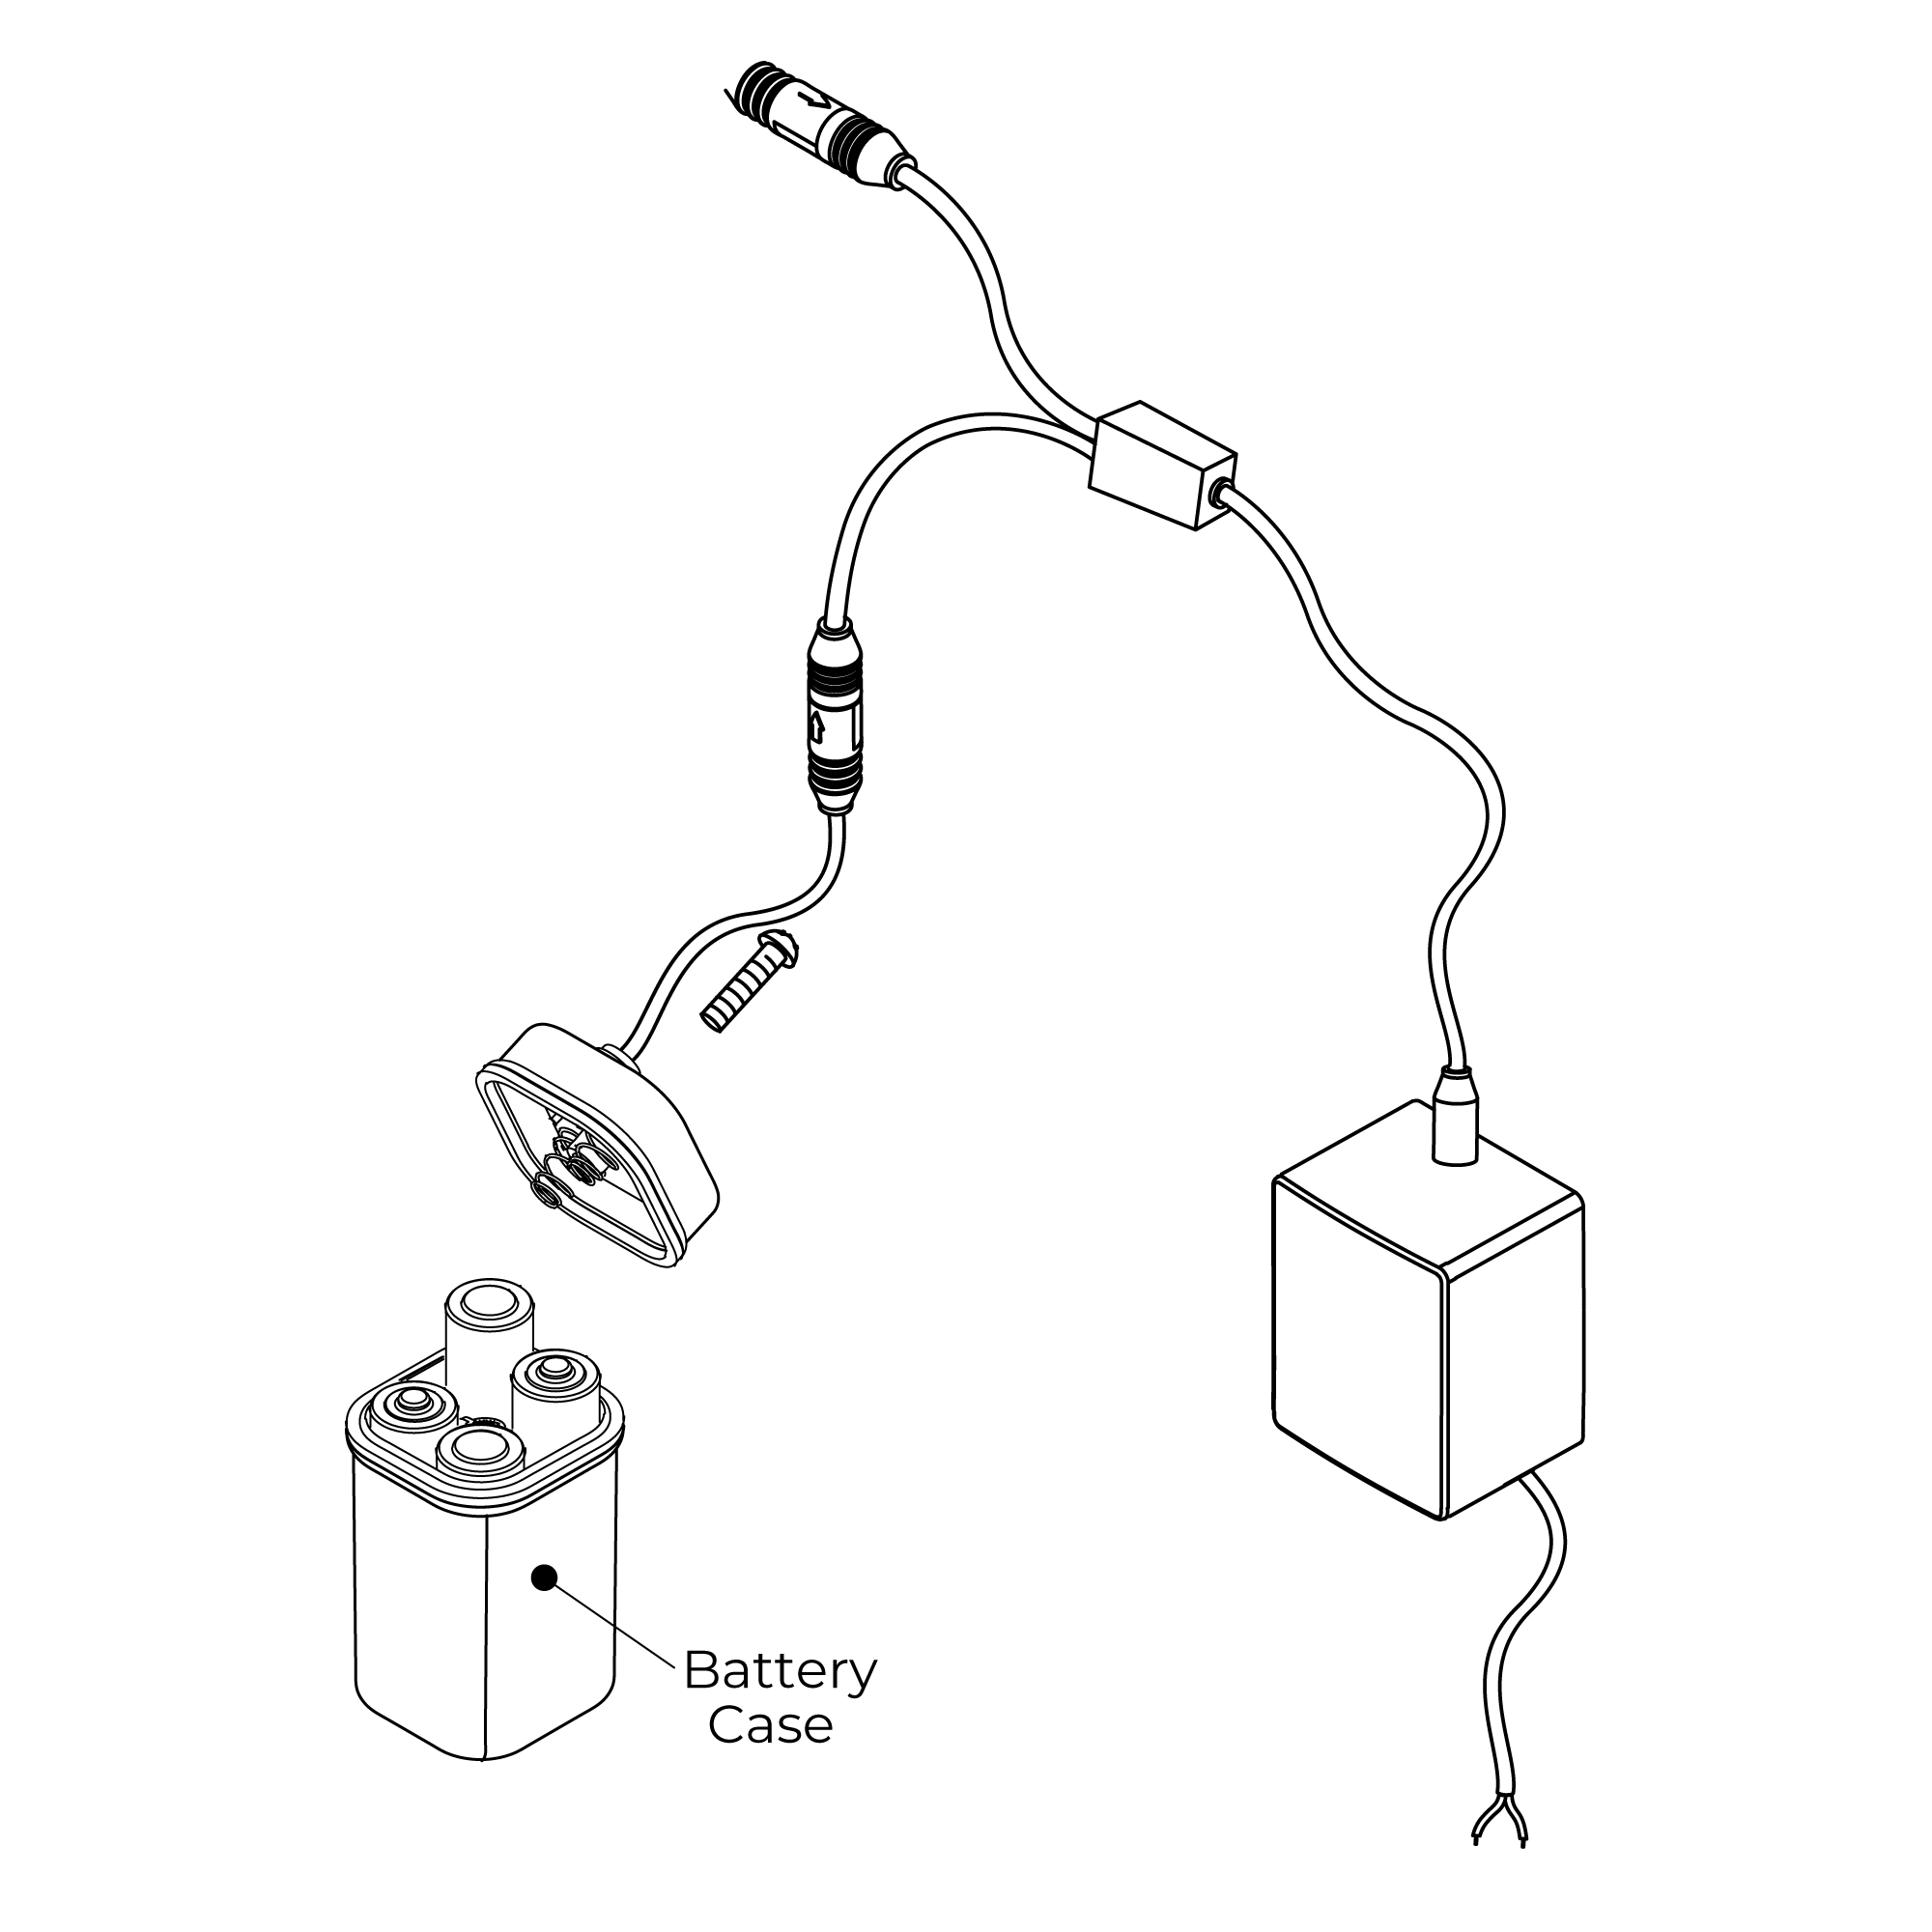
8. Inserting Batteries
Remove the battery cover by loosening the screw in the top of the cover.
Insert 4 x AA batteries into the battery box ensuring they are inserted the correct way.
Note: Only use 1.5V AA (LR6) Alkaline batteries (preferably => 2000mAh for good battery life).
Replace the battery box cover and tighten the screw. Insert the battery box into the holder.
Push the holder into the battery box wall bracket.
Soap Disp Commissioning
Commissioning Sequence
Before using the soap dispenser for the first time the following sequence must be carried out.
Fill the bottle full of liquid soap.
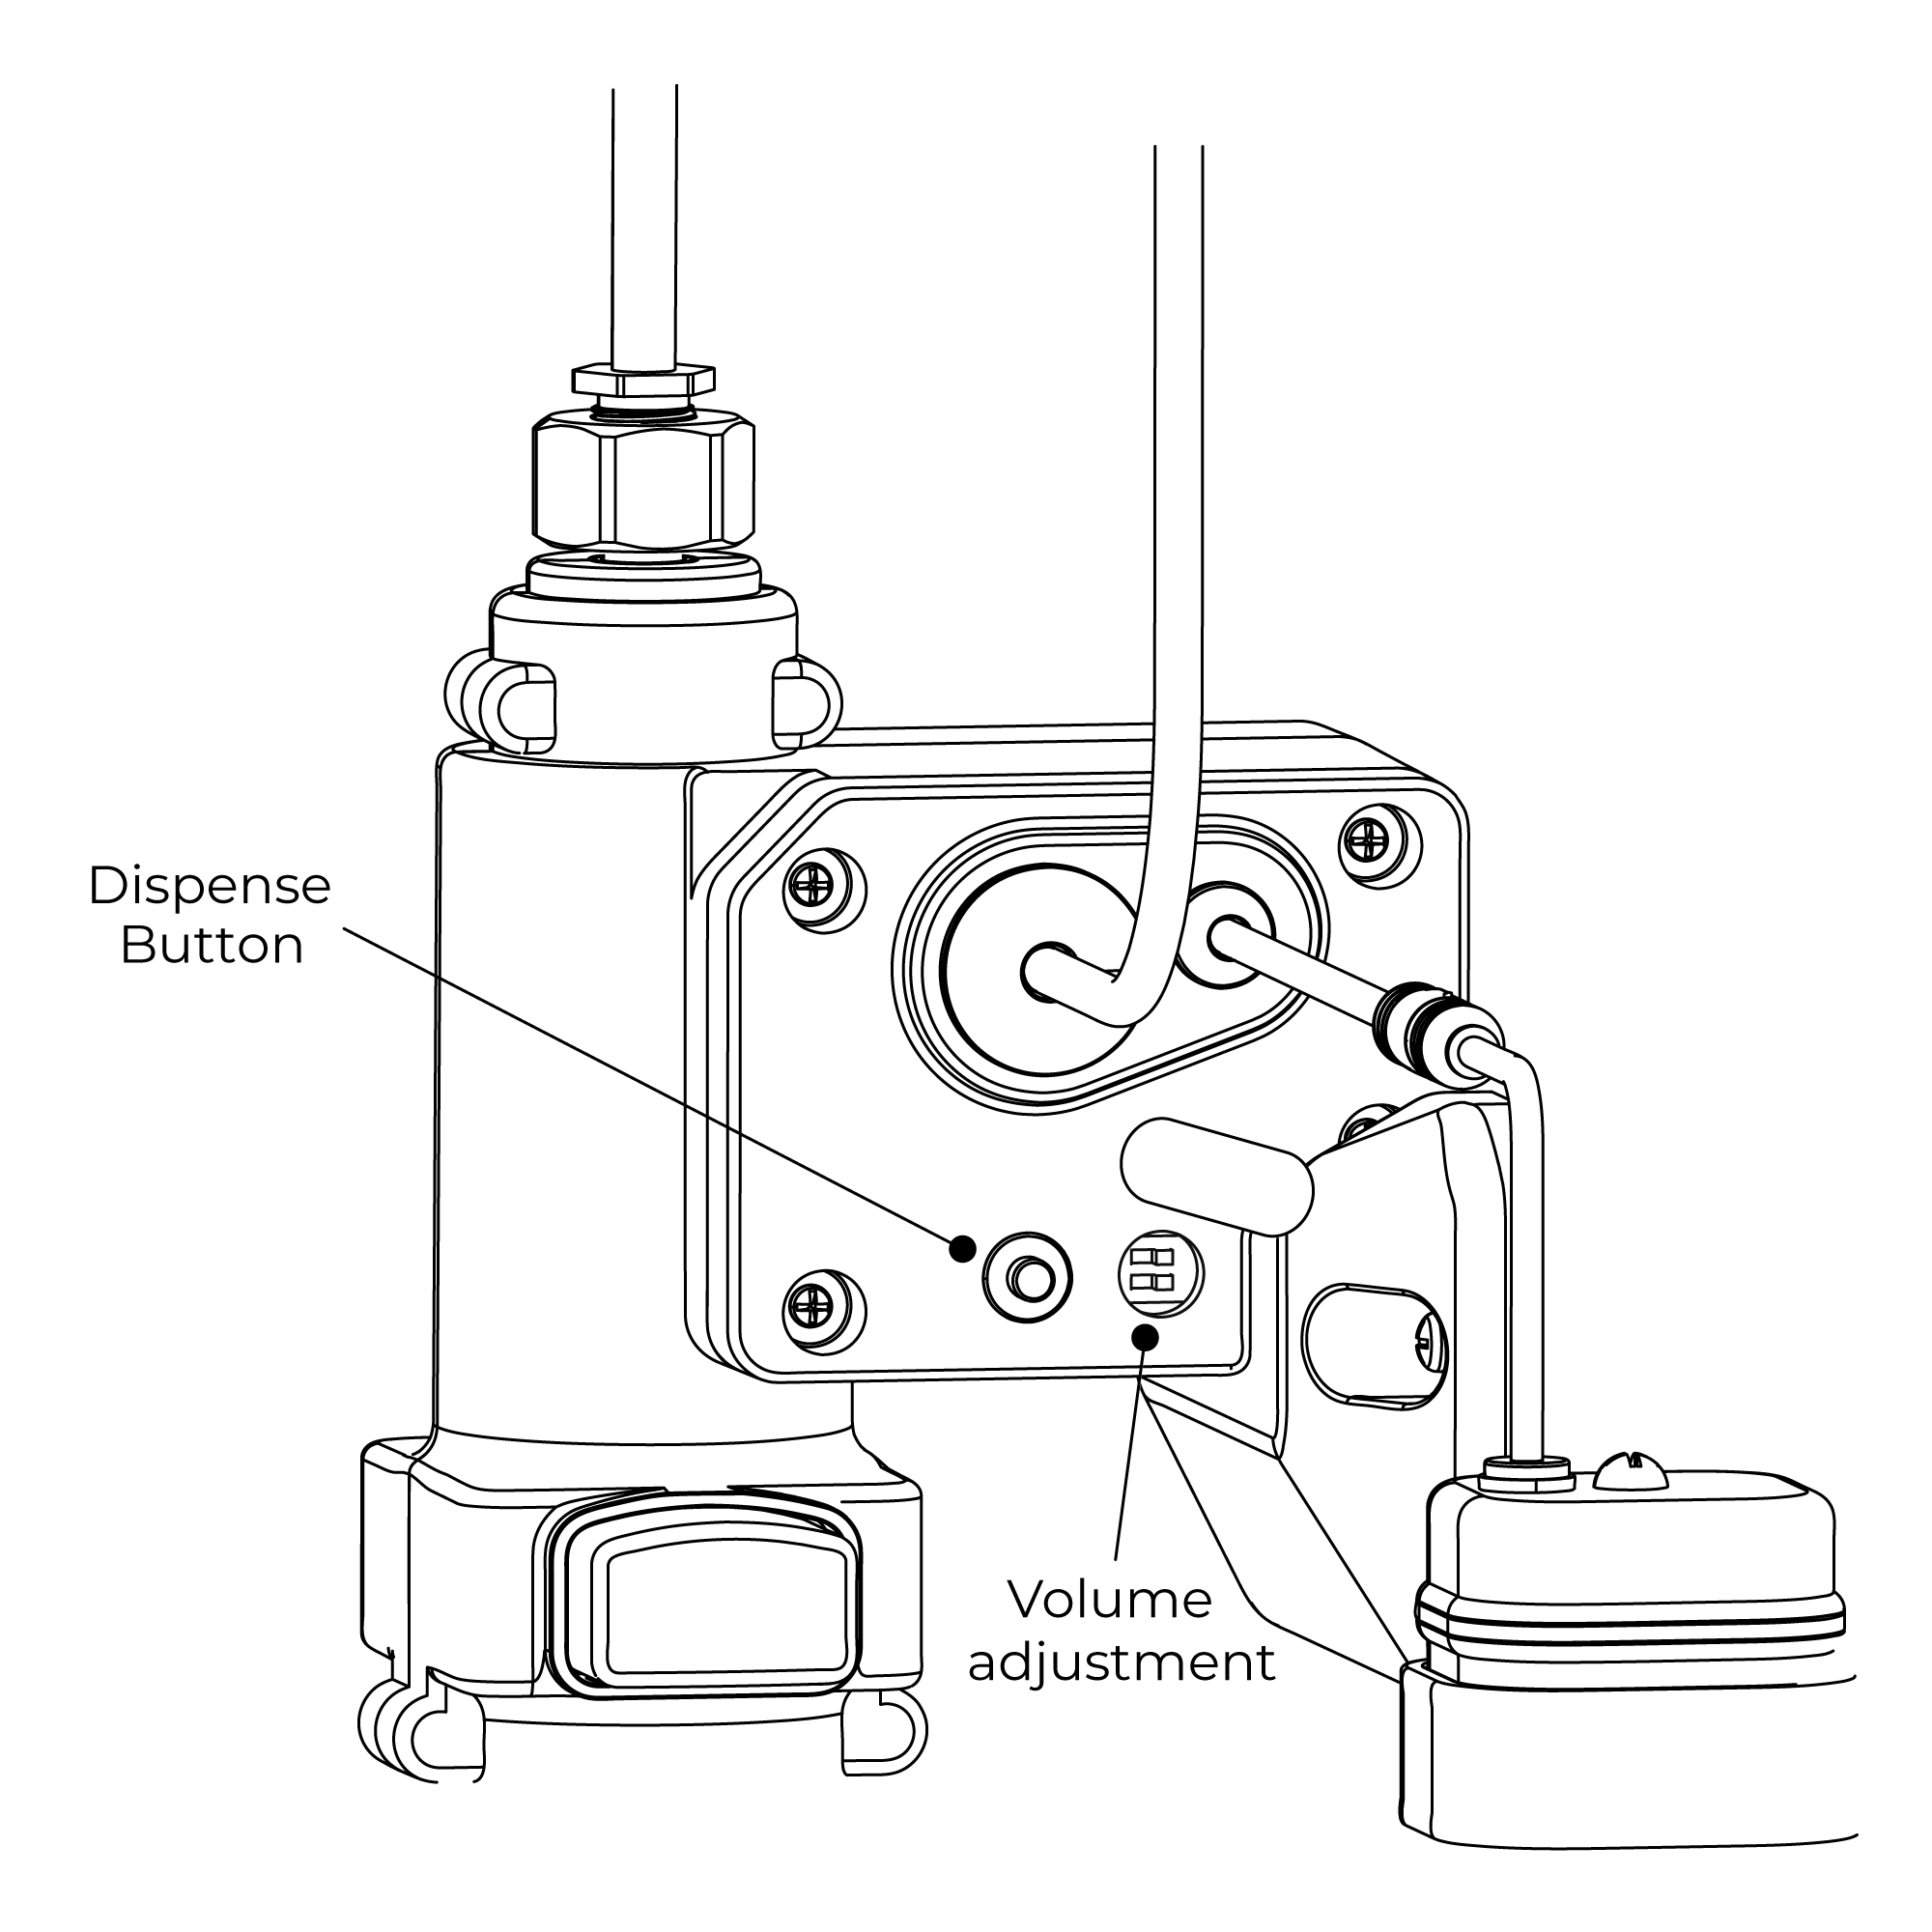
Locate the dispense button on the side of the pump. Press and hold the button until soap is dispensed from the spout. This will ensure the dispenser tube and cable are full of liquid soap.
Selecting Volume Adjustment
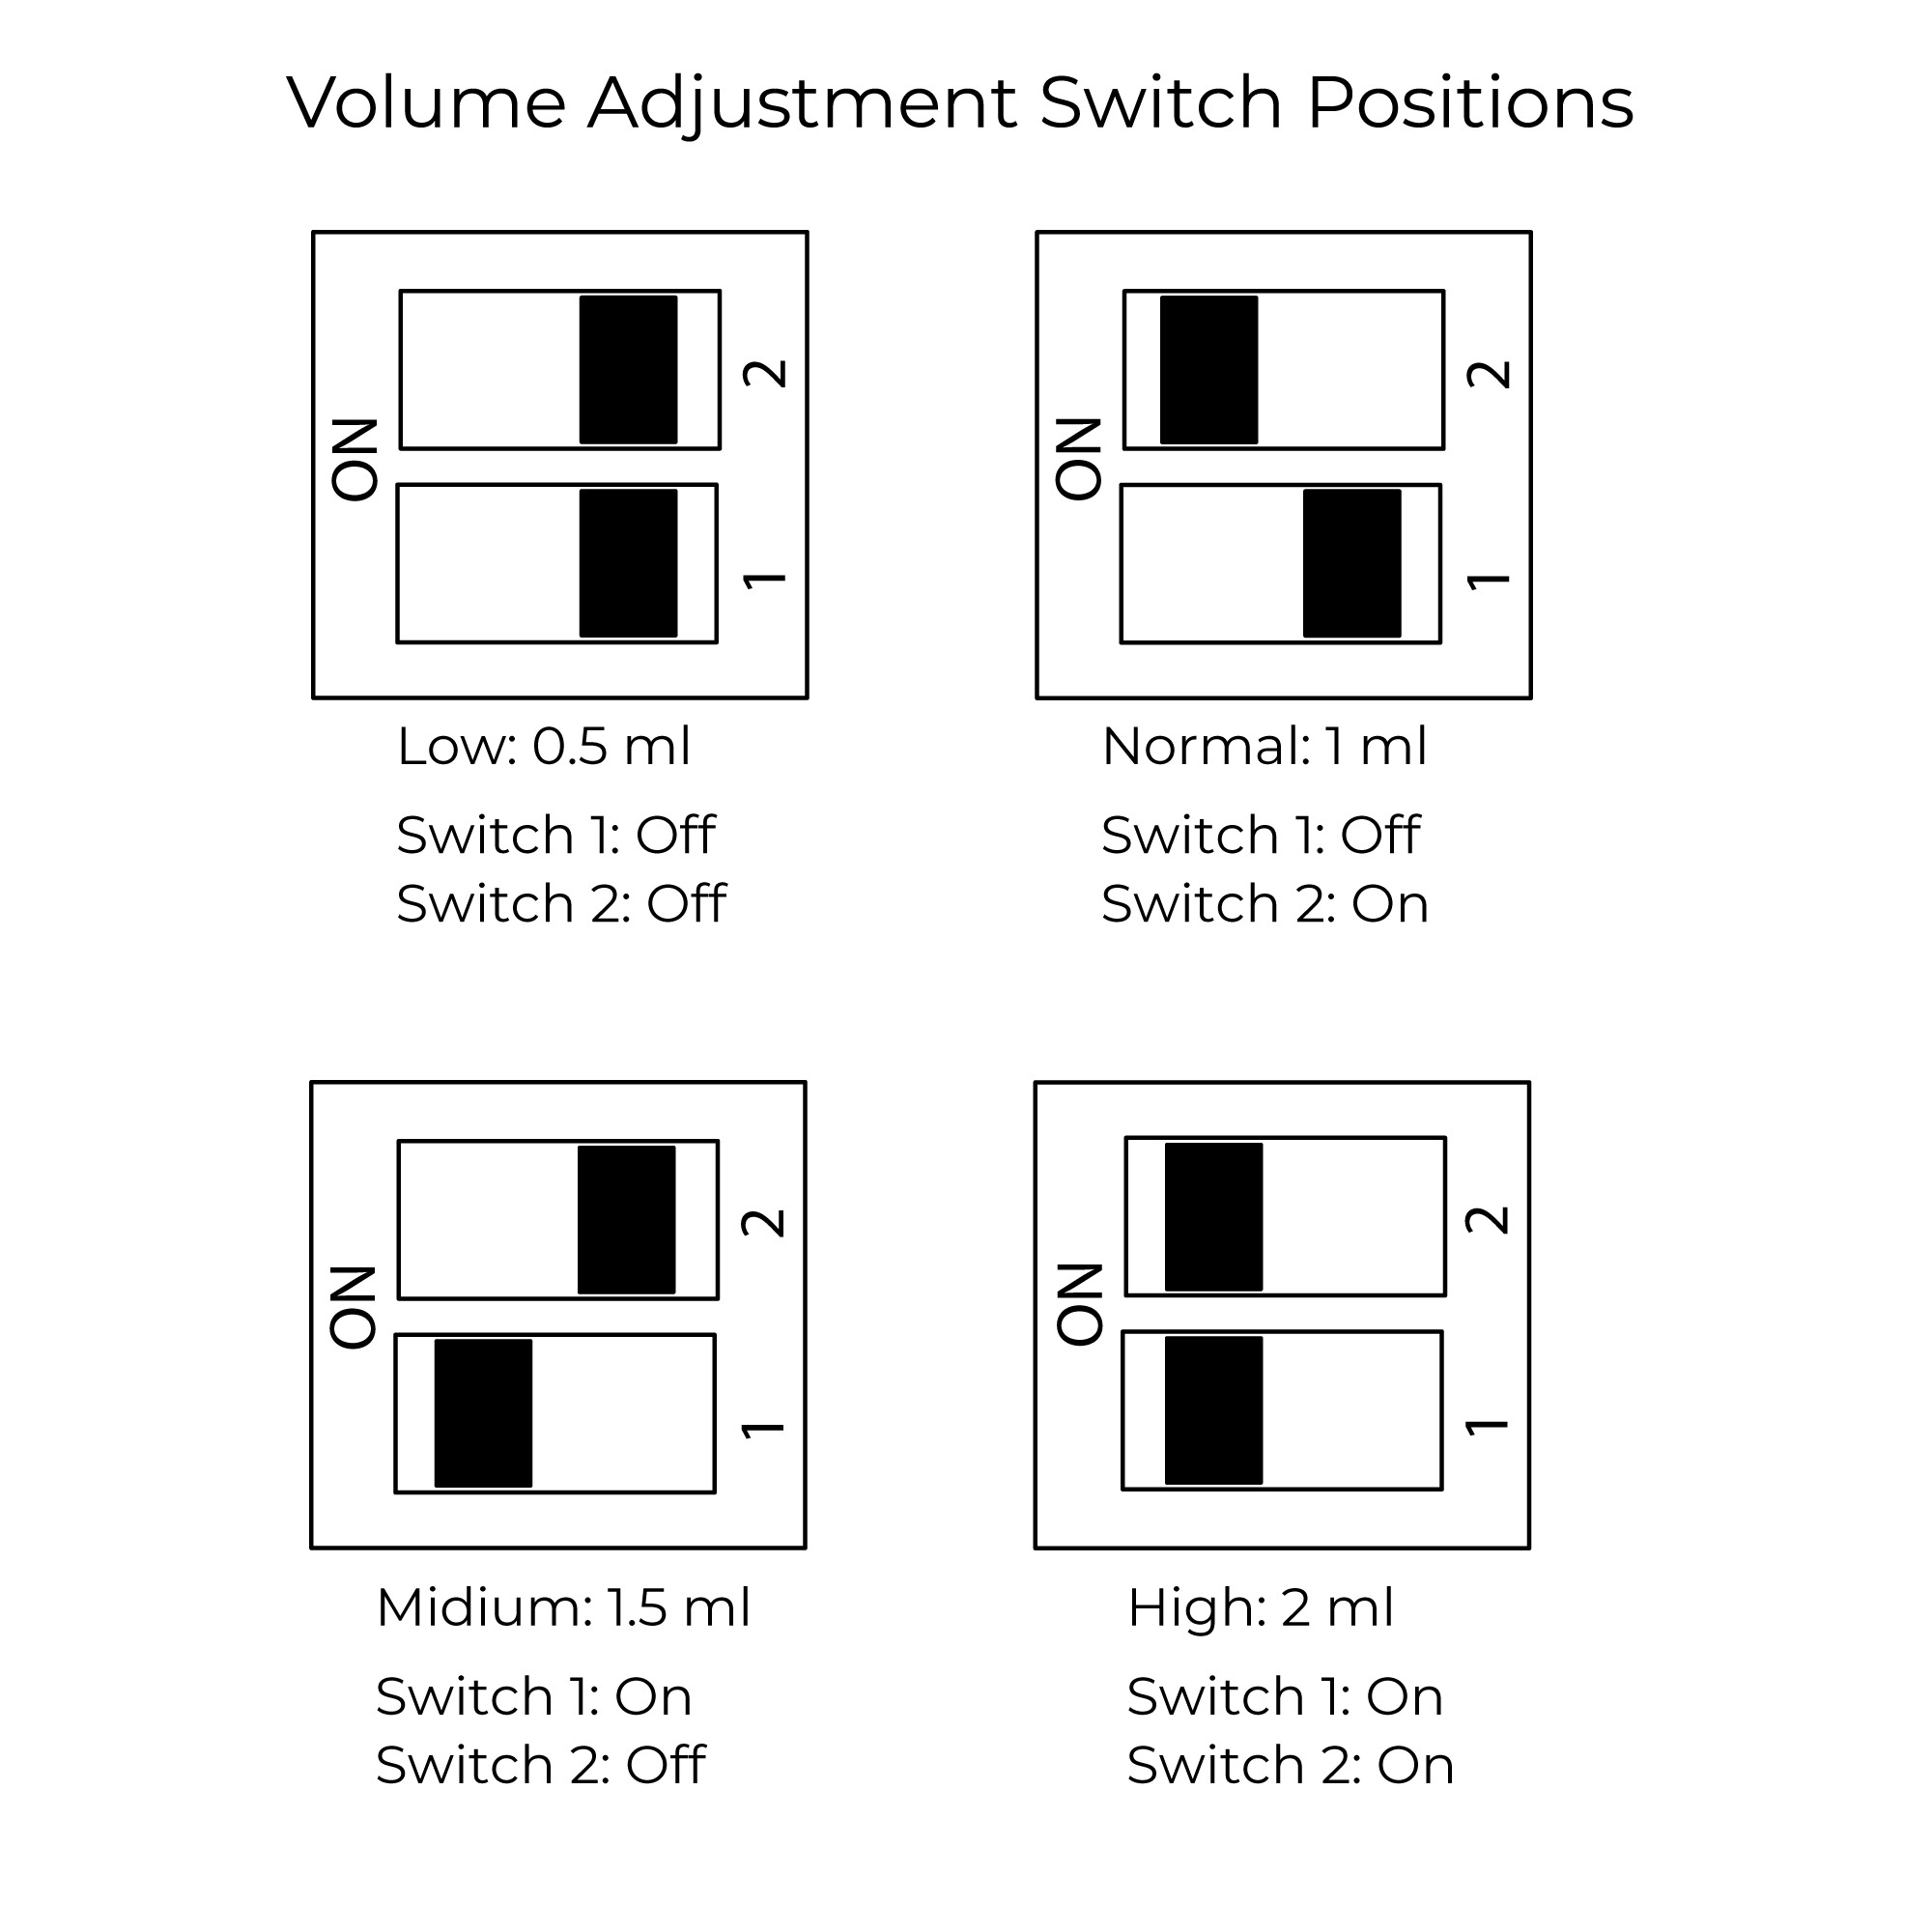
The soap dispenser has four dispense volume adjustment settings. Each adjustment setting dispenses a different volume of liquid soap.
To adjust the volume of soap dispensed follow the steps below.
Locate the volume adjustment switches under the rubber cover.
Set the switches to the required position for the desired volume adjustment setting.
Refer to the switch position diagrams.
Operation
Using the Automatic Soap Dispenser
Place the users hands under the spout within the sensing range.
Once the users hands have been detected a small amout of liquid soap will be dispensed from the spout into the users hands.
|
|

|
|
|
|

CARE AND MAINTENANCE
|
1:
|
|
2:
|
|
instruction
|
 |
|
|
|
|
|
3:
|
|
4:
|
 |
|
 |
|
|
|
|
|
5: |
|
6:
|
 |
|

|
|
|
|
|
1. Fill the soap bottle with liquid soap for the first use.
2. Press and hold the button until liquid soap is dispensed from the nozzle.
3. Place hand below the nozzle to dispense liquid soap into the palm of hand.
The soap dispensers have 4 settings to adjust dispense of soap, the first gear being the least volume and the fourth being maximum. Factory default is set at second gear.
CARE AND MAINTENANCE
If the soap dispenser fails to function correctly, firstly check all connections are tight and free from air leaks. If dispenser still fails to function, place manifold into a bottle of warm water. Pump the warm water through the dispenser to dislodge any dried soap residue and then refit manifold into soap bottle.
Water marks and soap residue on polished chrome surfaces are best cleaned using warm water and a mild detergent. Use a stainless steel cleaner for brushed stainless steel soap dispensers. Never use an abrasive cloth to remove stubborn stains. Dry with a soft clean cloth.
|
|

|
•
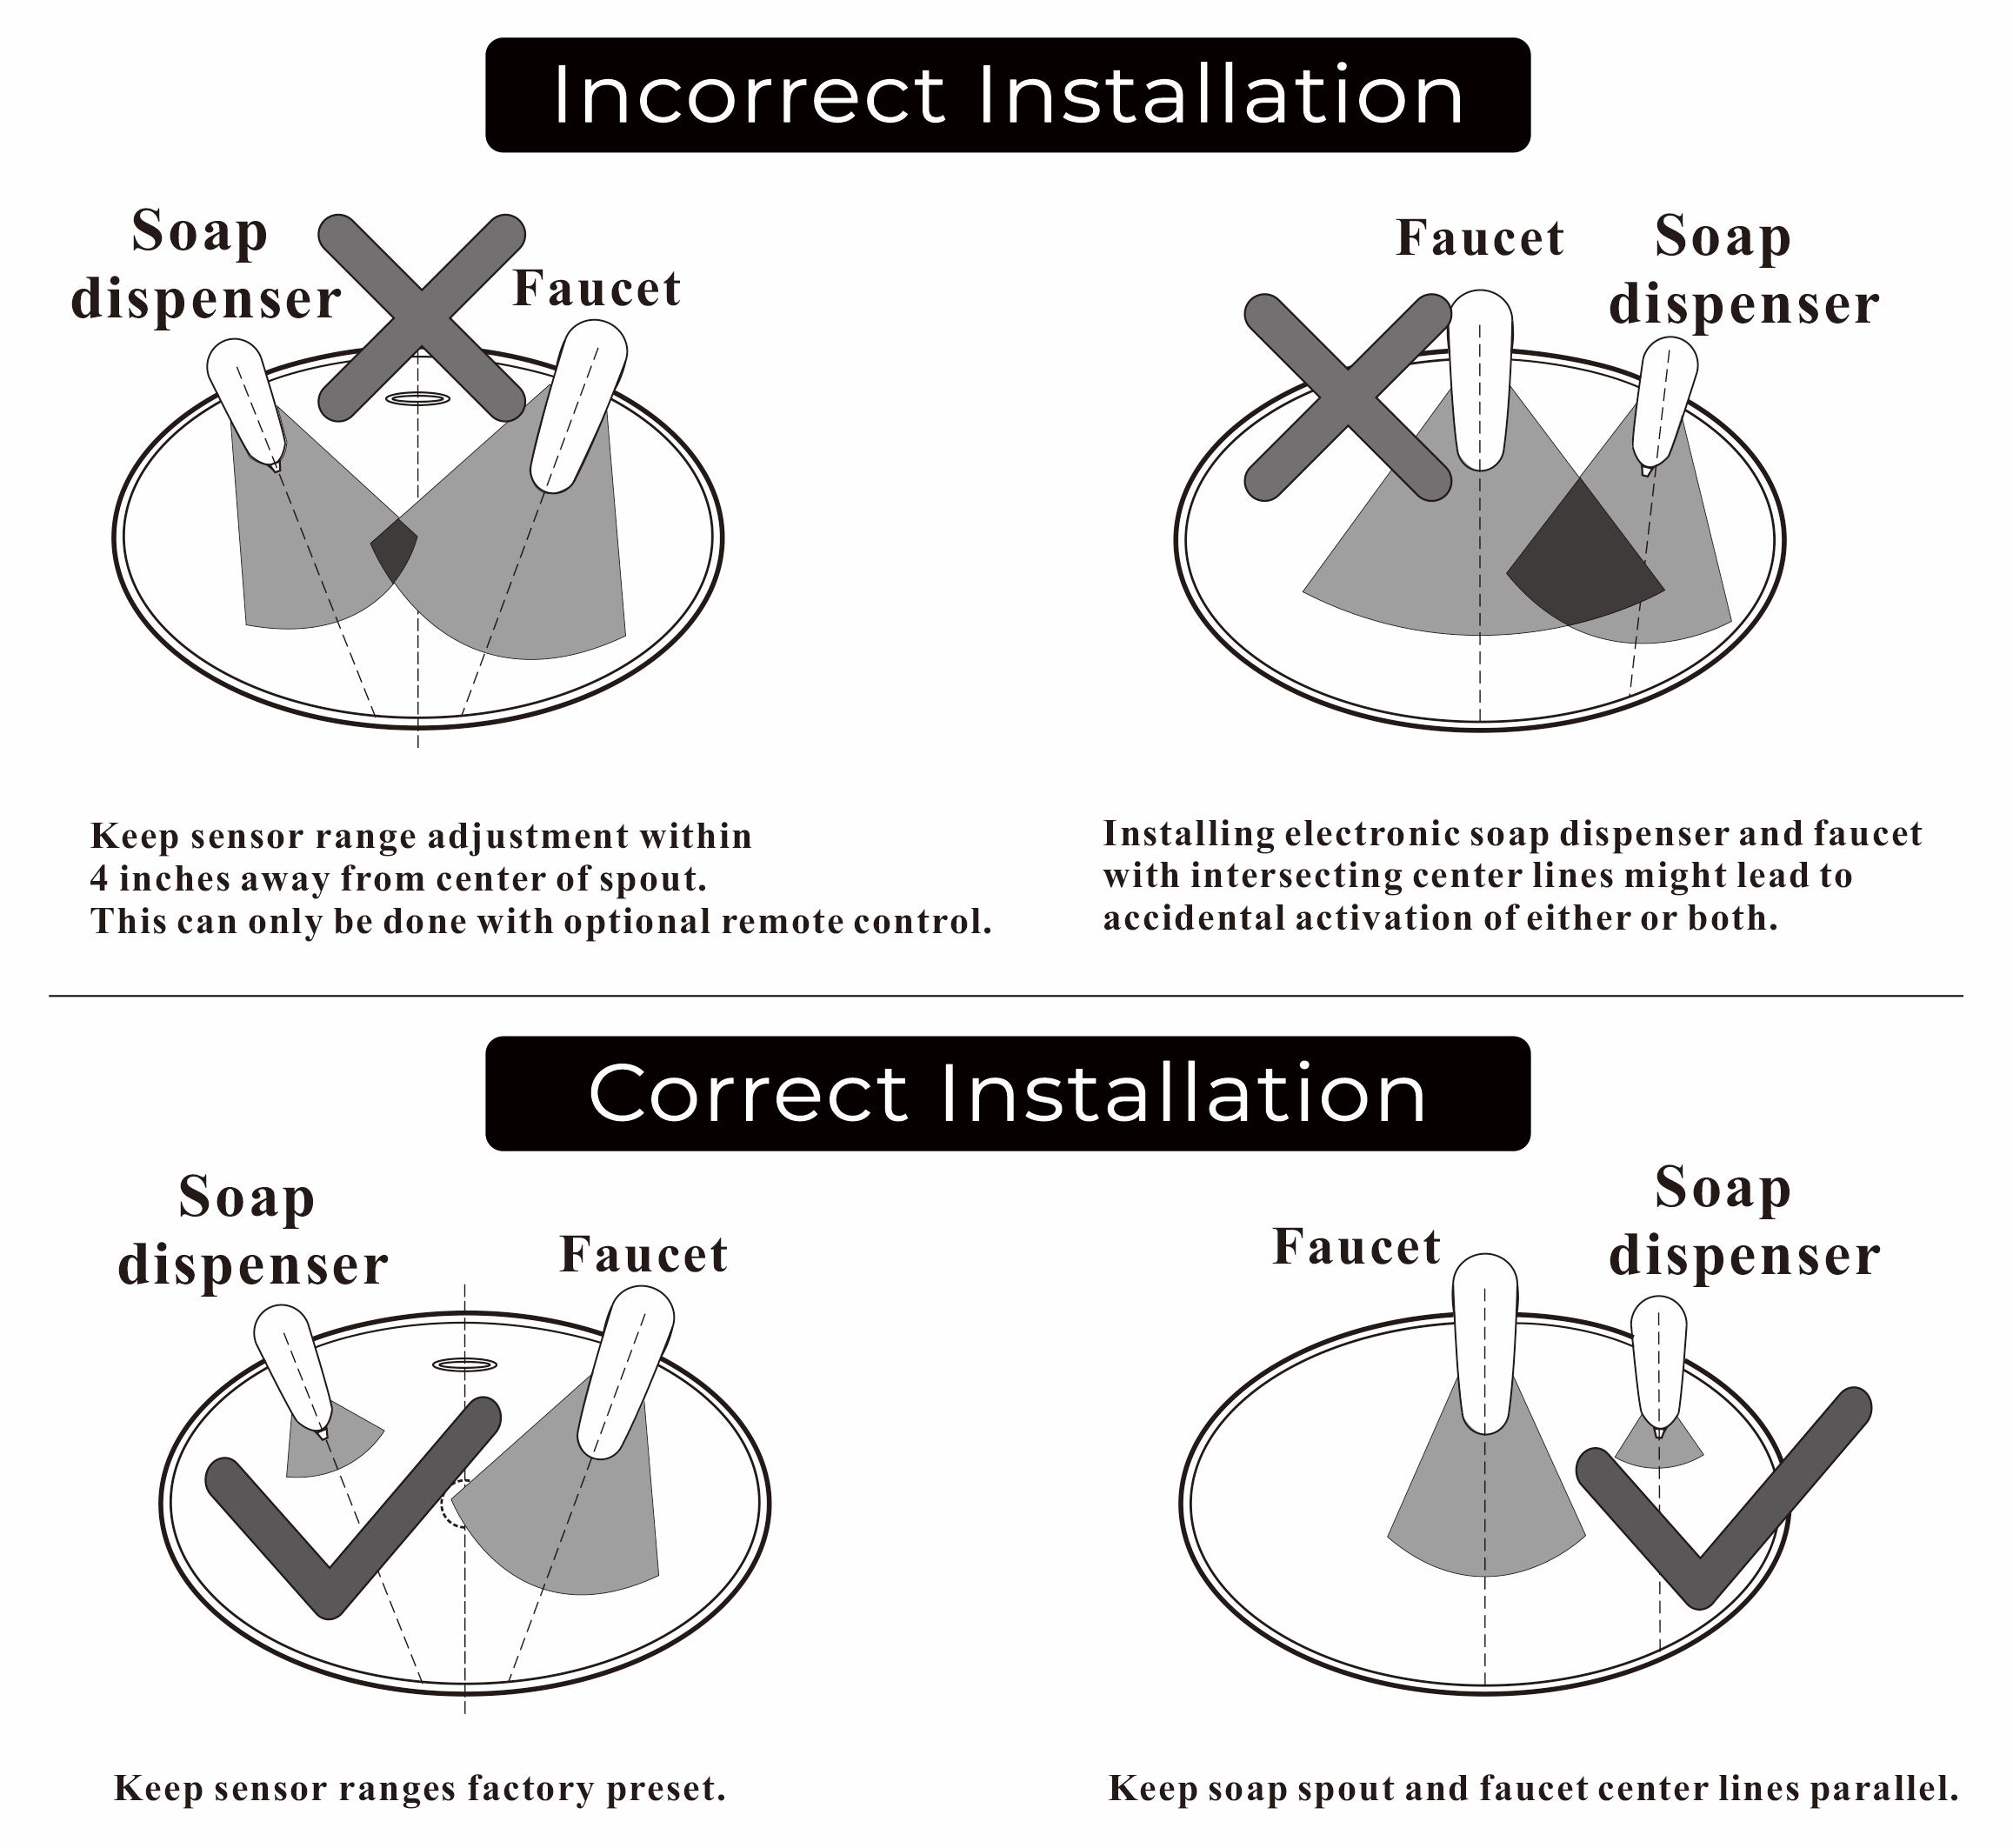
ALWAYS mount the soap tank feeding the dispenser/s BELOW the level of the dispensers
• NEVER mount the soap tank feeding the dispenser/s ABOVE the level of the dispensers
Also please note:
The soap type and brand used in these dispensers should not be altered throughout the life of the dispenser as mixing soaps can affect their chemical characteristics and cause them to become more aggressive. If another soap type or brand is needing to be used then the previous type must be thoroughly flushed through and cleaned from the soap dispensers and system prior to its use.
|
|
|
|
|
|
|
|
|
|
Lyon Chrome Automatic Soap Dispenser
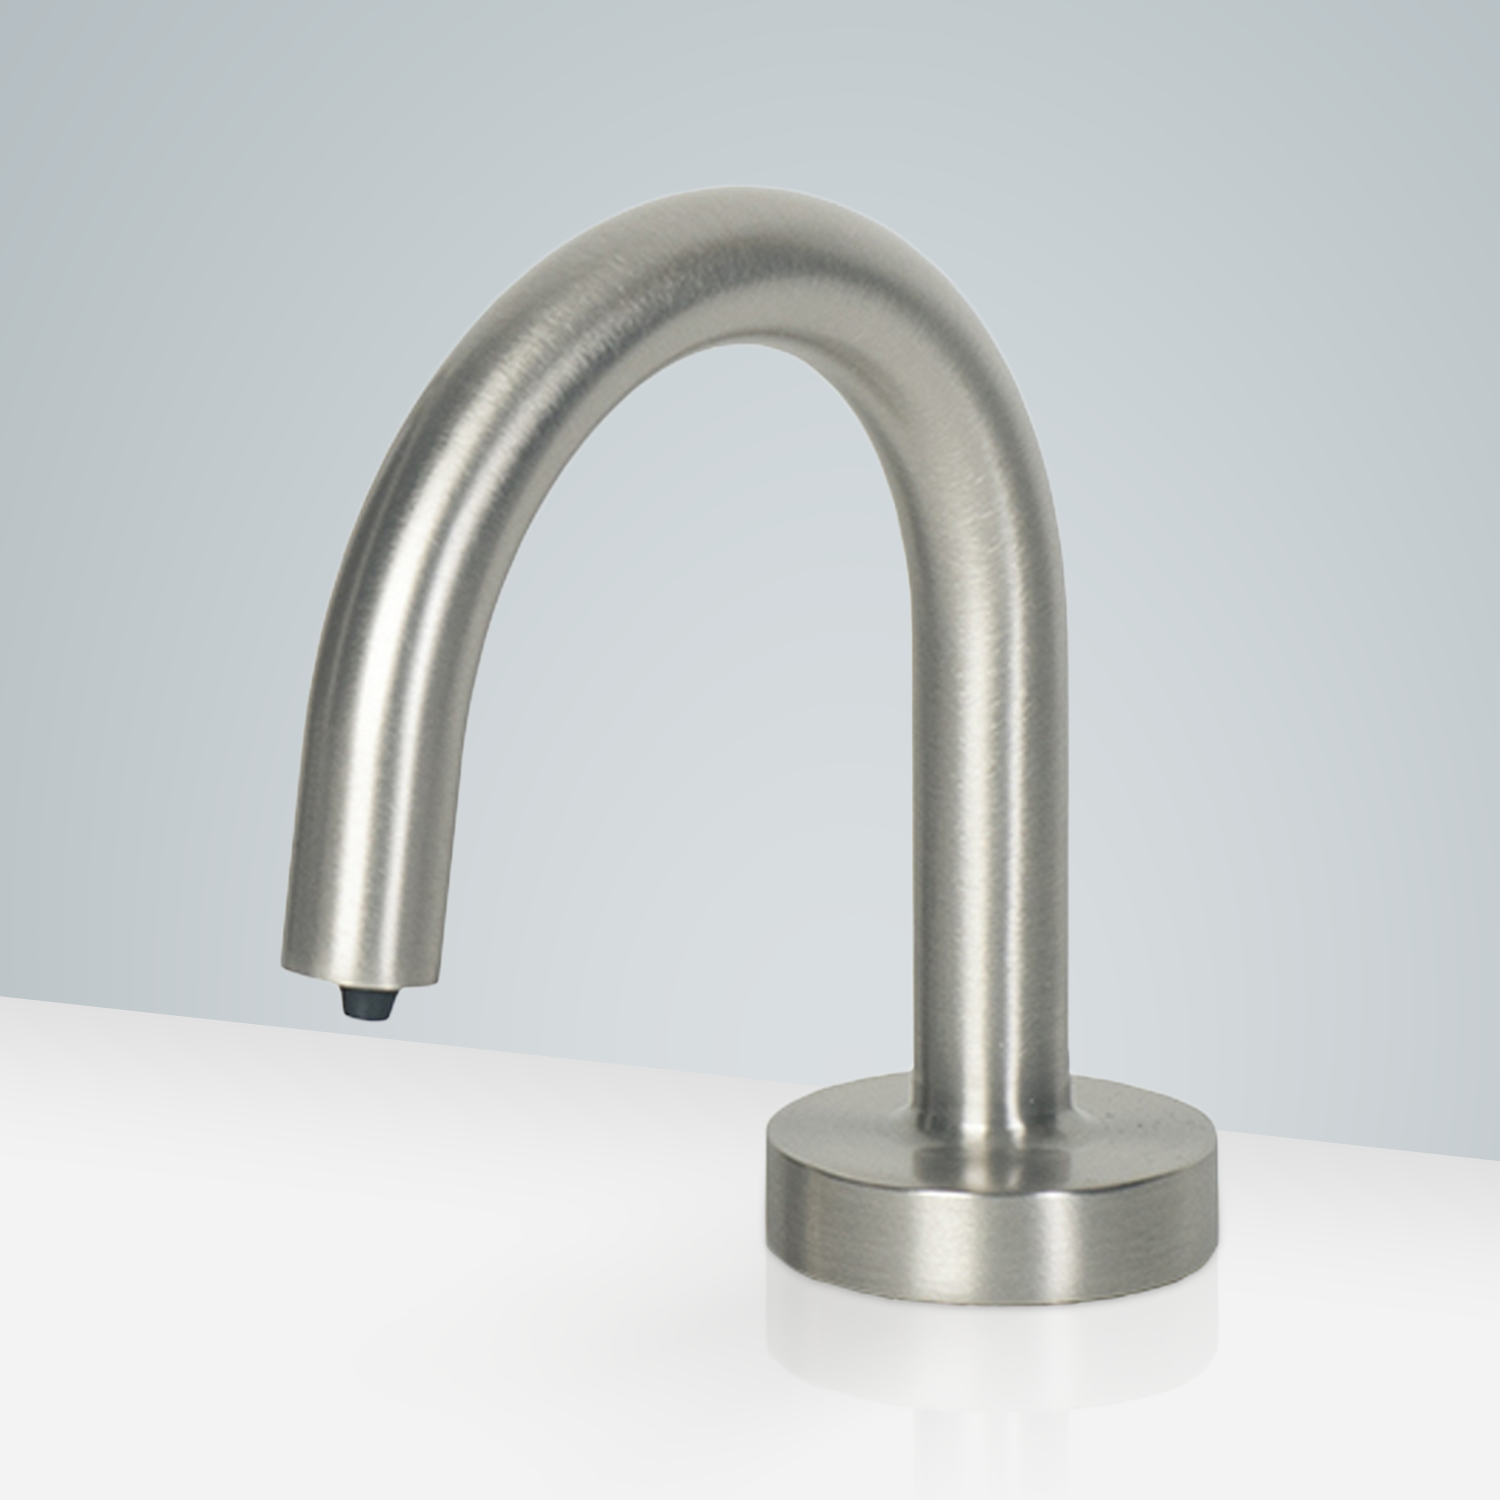
| This lyon chrome automatic soap dispenser is ideal for bathroom applications where soap dispensers are an intricate component of the room overall design element. Fontana FS10048 is a heavy duty soap dispenser designed for heavy traffic applications. It features: brass soap spout construction (not plastic as with most competing dispensers), industrial quality soap pump system generally used for medical and aerospace applications. A workhorse. This soap dispenser is designed for above sink installation and use. It is installed in the sink vicinity near the faucet. It is available in battery power, or optional ac power. Soap is refillable from below the counter. |
|

|
|
|
|
|
Features:
|
Brand Name: FontanaShowersModel Number: FS10048Type: Soap DispenserInstallation Type: Deck Mount Auto DispFinish: Chrome Soap DispSpout Material: Solid BrassPower: 4 (D) Batteries / AC Adapter OptionalSoap Pump: 6 VoltSensor type: Active Infrared, Self-AdjustingSensing Range: Adjustable with optional remote controlWorking Soap: Standard liquid SoapSoap Bottle Capacity: 800 ML (optional 1 gallon containers)Soap Amount Per Use: 0.5 ML to 1.5 ML (adjustable)
|
 |
|
|
|
The installations & illustrations for Lyon Brushed Nickel Automatic Soap Dispenser are for informational purposes only.

|
|
|